Rafts, Skirts and Brims!


This tutorial will help you understand the differences between rafts, skirts and brims. All three techniques provide a starting point for your 3D printed models, but they have different uses and advantages.
Rafts
A Raft is a horizontal latticework of filament that is located underneath your part. Your 3D printed part will be printed on top of this raft, instead of directly on the build platform surface. Rafts are primarily used with ABS to help with warping and bed adhesion, but they can also be used to help stabilize models with small footprints, or to create a strong foundation on which to build the upper layers of your part. The raft included in Simplify3D has been optimized over years of testing on hundreds of different machines to ensure easy separation and a high-quality surface finish on the bottom of your part. Once the print is complete, the raft effortlessly peels away from the print and can be discarded.
For our example today, we are going to add a raft to the popular “Dodecahedron” model. First, download and import the STL file from here. Then click “Edit Process Settings” in Simplify3D and place a checkmark beside the “Include Raft” option. The software also includes many settings that allow you to customize the raft for faster print times or improved adhesion. To adjust these setting, click on the “Show Advanced” option in the bottom left of this window and then go to the Additions tab. This tab contains the settings for the raft, as well as the skirt and brim which we will discuss shortly. An explanation of the important settings are given below:
-
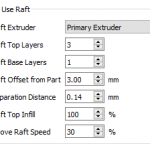 Raft Top Layers – The number of interface layers that are printed at the top of the raft. Your model will be printed on top of these layers, so you usually want at least 2-3 layers to ensure a smooth surface.
 - Raft Base Layers – The number of extra-thick layers at the very bottom of the raft. These layers are printed slow and thick to ensure a strong bond to the build platform.
- Raft Offset from Part – How wide the raft will extend beyond the edges of your part
-
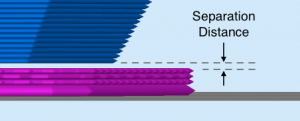
Separation Distance – This is an important setting that defines the height of the air gap between the raft and your part. Typically, having a gap of at least 0.1mm will help keep the part connected to the raft,
while still allowing for easy separation once the print is complete. - Above Raft Speed – Use this setting to customize the speed of the first layer of your part that is printed on top of the raft surface. Using a slow speed for this layer will also help the part stay attached to the raft during the print.
Adjust any of these settings and then click OK to save your changes. Click “Prepare to Print” to use the realistic pre-print simulation in Simplify3D to view an animated preview of the exact settings that you changed and how they will affect the print. Once you are happy with the changes, you can try running a test print on your 3D printer.
 When the print is completed, remove the entire raft and model from the build platform. You can then grab the raft and begin to peel it away from the part, leaving a high-quality surface finish on the bottom of your print. Usually, this can be done by hand, but for extra delicate parts, you may want to use a thin spatula or tweezers to help with the removal. If you find you are having a difficult time removing the raft from the part, you can try increasing the raft separation distance or altering the other settings explained above.
Skirts
A skirt is an outline that surrounds your part but does not touch the part. The skirt is extruded on the print bed before starting to print your model. Skirts serve a useful purpose because they help prime your extruder and establish a smooth flow of filament. Observing the skirt also allows you to detect and adjust any leveling or adhesion issues before the actual model begins printing.
You can customize your skirt by adjusting the settings on the Additions tab. This allows you to adjust the skirt position, the amount of plastic that is primed, and even the extruder that is used for the skirt.
-
 Skirt Extruder – Choose the extruder that will be used to print the skirt. This allows you to prime different extruders at the start of your print. If you want to prime all of your extruders, select the “All Extruders” option.
 - Skirt Layers – How many layers you want to include a skirt. Typically, 1 layer is enough to prime the extruder, but adding a 2nd or 3rd layer may help create a more robust skirt that can be peeled away from the bed easier.
- Skirt Offset from Part – How far away the skirt should be from the edges of your part
- Skirt Outlines – How many loops you want to print around the outline of your model. Increase this value if you need to prime your extruder more by extruding extra filament.
Brims
A Brim is a special type of skirt that is actually attached to the edges of your model. Typically, the brim is printed with a increased number of outlines to create a large ring around your part, similar to the brim of a hat. Brims are often used to hold down the edges of your part, which can prevent warping and help with bed adhesion. The Brim may be a preferred option to the raft (which also helps with adhesion), as the brim can typically be printed much faster and uses far less filament. Once the print is complete, the thin brim can be separated from the solid model and discarded.
Because the Brim is a special type of skirt, it uses many of the same settings explained in the previous section. To setup a Brim in Simplify3D, set the skirt offset to 0mm so that the brim will be touching the edges of your model. Then increase the number of skirt outlines to 5 or more to create a wide ring around your part. You can raise the number of outlines even further if you need to increase the surface area of the brim for extra adhesion. Now when you start your print, the brim will serve as both priming and an adhesion assistant!
After the print is complete, the thin brim should easily peel away from the solid part. If you find that the brim is attached too firmly, you could increase the skirt offset slightly to 0.1 or 0.2mm to add a small gap between the brim and the part.
Now you know 3 new techniques to help improve the foundation of your 3D printed parts! Next time you are struggling with adhesion, priming, or small delicate parts, you will know the exact technique to use.
More Tips to Improve Your Prints
If you want even more tips on how to improve your 3D printed parts, be sure to check out our extensive Print Quality Guide. This guide covers dozens of common issues and provides tips and suggestions for each one, giving you the knowledge you need to succeed.