Dense Support Structures
Save time and filament while getting great support using dense support structures in Simplify3DQuick Links
Video Transcript
Save time and filament while getting great support using dense support structures in Simplify3D. As we’ve explained in a previous video, some models need to be printed using support material, which prevents overhangs from being printed over thin air.
Our example model is this famous Paris monument, the Arc de Triomphe. And today we’re printing with two different materials. We’re printing the arch itself in PLA and printing the support structures in PVA, a water-soluble filament. Dissolvable filament is great to use for supports when you need a clean surface finish on the underside of a part where they are in contact with support structures, or if you will have support structures that are difficult to remove otherwise. And for those of you that have ever purchased PVA, you know that it can be quite expensive.
We’re also going to be using a unique feature in Simplify3D called dense supports which will save us time and plastic. Let’s preview how this model will be printed if we don’t use support structures. There are portions of this arch that will need support material. Otherwise our extruder will be trying to add a new layer of plastic here with nothing underneath it.
So let’s open Process Settings, click Show Advanced, and go to the Supports tab. You may notice some settings look familiar; those for automatic placement which you can also access from the Customize Supports window. I’ve printed this model before, so I’ve already set the pillar resolution to 2mm to capture some of its smaller details and changed the support type to From Build Platform Only so we’ll only be dealing with the supports on the underside of the arch.
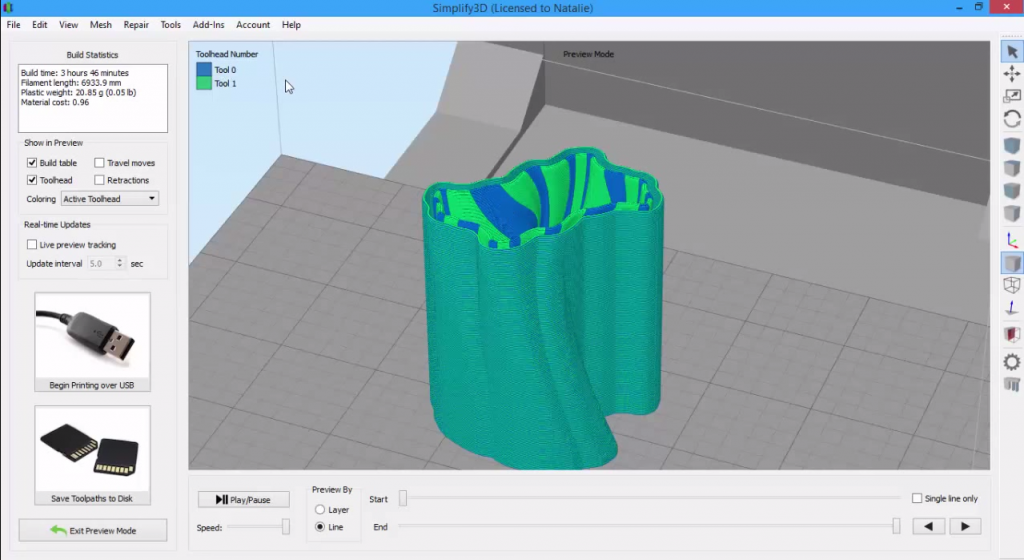
Let’s go back into the preview. When the printer builds the arch, it will be now supported from below. Before we get into dense support structures, let’s review some terminology. Most of you are probably familiar with infill percentage, which determines how much plastic is printed on the interior of the part. An infill percentage of 100% would be completely solid. In this case, our infill is set at 20%, so this part is only 20% solid on the inside.
The same concept of fill percentage also exists for support structures. These support structures are currently set to have an infill of 30%, so you can see that these support walls are closer together, making them more solid than the infill on the interior of the part. But this 30% infill is used for the entire height of the support structures, which is going to use more of my expensive PVA filament than I would like.
There’s a feature in the software called dense support structures which allows you to vary the density of your support material. It will allow us to use a lower infill percentage for the majority of the support, and only transition to a higher infill percentage where the structures are contacting the surface of the part. To enable this feature, we change the number of dense support layers, or how many layers of this higher-infill support will be printed. Let’s change it to 5.
The only other setting we have to think about here is the support infill. We have the infill percentage for the normal supports, and the infill percentage for the dense supports. Let’s leave the dense support infill at 70%, but decrease the normal support infill to 15%. This will save us a lot of filament.
So if we slice, now you can see that we still have our regular supports, shown in light gray, but for the last 5 layers before the supports make contact with the part, we have these denser supports, shown in dark gray. Now, if you happen to be using a single extruder printer, that means you’ll be printing both the part and the support structures in the same material. For that reason, the software is usually set up to have a small amount of separation in between the part and the supports to prevent them from bonding together, which allows you to remove the supports easily. But as I mentioned in the beginning, I’m using a water-soluble filament for my support structures, so I’ll want to set things up a little differently.
For water-soluble filaments, we don’t need to snap the supports off the part when it’s done printing. We’re going to let warm water remove the supports! In this case, we actually do want the PVA support structures to bond to our PLA part, so we’re going to remove some of that separation. This is part of the reason why printing with water-soluble supports can improve the surface finish on the underside of your parts.
So let’s go back, open the support tab, and look at the Separation from Part section. I’m going to decrease the horizontal offset to .1, and change the upper and lower separation layers to 0. These settings will work well for dissolvable filament.
So now that you know how to use dense supports, you can save time and filament while also getting great 3D prints!
Related Videos
The Dual Extrusion Wizard
Learn how to create crisp two-color prints quickly and easily with the Dual Extrusion Wizard.
Splitting & Aligning Models
Sometimes you may need to split a model into individual pieces so you can work with each part independently. Other times, you might want to realign parts exactly as they were originally modeled. Simplify3D offers two features to help: Separate Connected Surfaces and Align Selected Model Origins.
Selecting & Grouping Models
Learn how to make changes to multiple models at a time by grouping them together.
Customizing Support Structures
Simplify3D allows you to customize where and how support material is placed on your model, making it easier to remove. This means a better 3D printed result!