Poor Bridging
Bridging is a term that refers to plastic that needs to be extruded between two points without any support from below. For larger bridges, you may need to add support structures, but short bridges can typically be printed without any supports to save material and print time. When you are bridging between two points, the plastic will be extruded across the gap and then quickly cooled to create a solid connection. To get the best bridging results, you will need to make sure that your printer is properly calibrated with the best settings for these special segments. If you notice sagging, drooping, or gaps between the extruded segments, you may need to adjust your settings for the best results. We will cover each of the areas that you want to address to make sure your can print the best bridges possible on your 3D printer.
Common Solutions
Verify bridging settings are being used
Bridging segments are identified with a special color in the Simplify3D preview. Click “Prepare to Print” to enter the Preview Mode and then change the coloring mode on the left-hand side to “Feature Type”. This will use a different color for each feature type, with bridging regions shown in yellow. Use the sliders at the bottom of the preview to scroll to the layer where you expect to see bridging extrusions and verify that these lines are shown in yellow. If the bridging area is not shown in yellow, there are a two settings you will want to check. Exit the preview, click “Edit Process Settings”, and go to the Other tab to view your Bridging settings. The first option in this section is the “Unsupported area threshold”. This allows the software to ignore very small bridging areas and focus on the larger bridging regions that may need special settings. If you think your bridging area is not being included, make sure that the area of your bridging region is larger than this threshold value. The second setting to check is towards the bottom of this list. By default, Simplify3D uses special perimeter settings for any perimeters that are printed as part of a bridging region, but you can also choose to use bridging settings for these regions if you wish. To do this, enable the “Apply bridging settings to perimeters” option, save your settings, and then return to the Simplify3D preview to verify your changes.
Check the angle used for the bridging infill
Simplify3D will automatically calculate the best infill direction to use for your bridging regions. For example, if you are bridging between two pillars aligned on the X-axis, the software will automatically change the infill direction for that area to ensure the infill is also being extruded along the X-axis. This greatly improves your odds of success, so if you notice that you are getting poor bridging results, you want to double-check to make sure the infill is oriented in the correct direction. If you have already verified that your bridging region is properly identified as a yellow bridging region in Simplify3D, then this change should happen automatically. If you ever want to try a different infill angle for these bridging layers, you can also do this by enabling the “Use fixed bridging angle” option in your process settings.
Adjust settings for optimal performance
The bridging regions in Simplify3D are printed with special extrusion, speed, and cooling settings to achieve optimal performance. The extrusion and speed adjustments for these regions can be found on the Other tab of your process settings. Typically, you will want to set the “Bridging extrusion multiplier” to 100% or more, as lower values may have trouble properly sealing the bottom of these surfaces. The “Bridging speed multiplier” may require some experimentation, as some printers will perform better with slow bridging, while others get better results by moving quickly. Finally, you can find the bridging fan speed settings on the Cooling tab of your process settings. Typically, you will want to set the “Bridging fan speed override” to a large value to make sure the bridges are cooled as quickly as possible. Experiment with these settings to find the best combination for your specific 3D printer and filament. There are many bridging test models available that can help with this calibration.
Use supports for longer bridges
In the event that you are unable to get the results you want after tuning the settings mentioned above, you may find that adding support structures will allow you to achieve the best quality. The support structures will provide an extra foundation for the bridging regions, greatly improving their odds of success. You can enable support generation for the entire model, or use Simplify3D’s customizable support structures for extra control. Please see this video for more details about using custom support structures.
Related Topics
Under-Extrusion
Printer does not extrude enough plastic, gaps between perimeters and infill
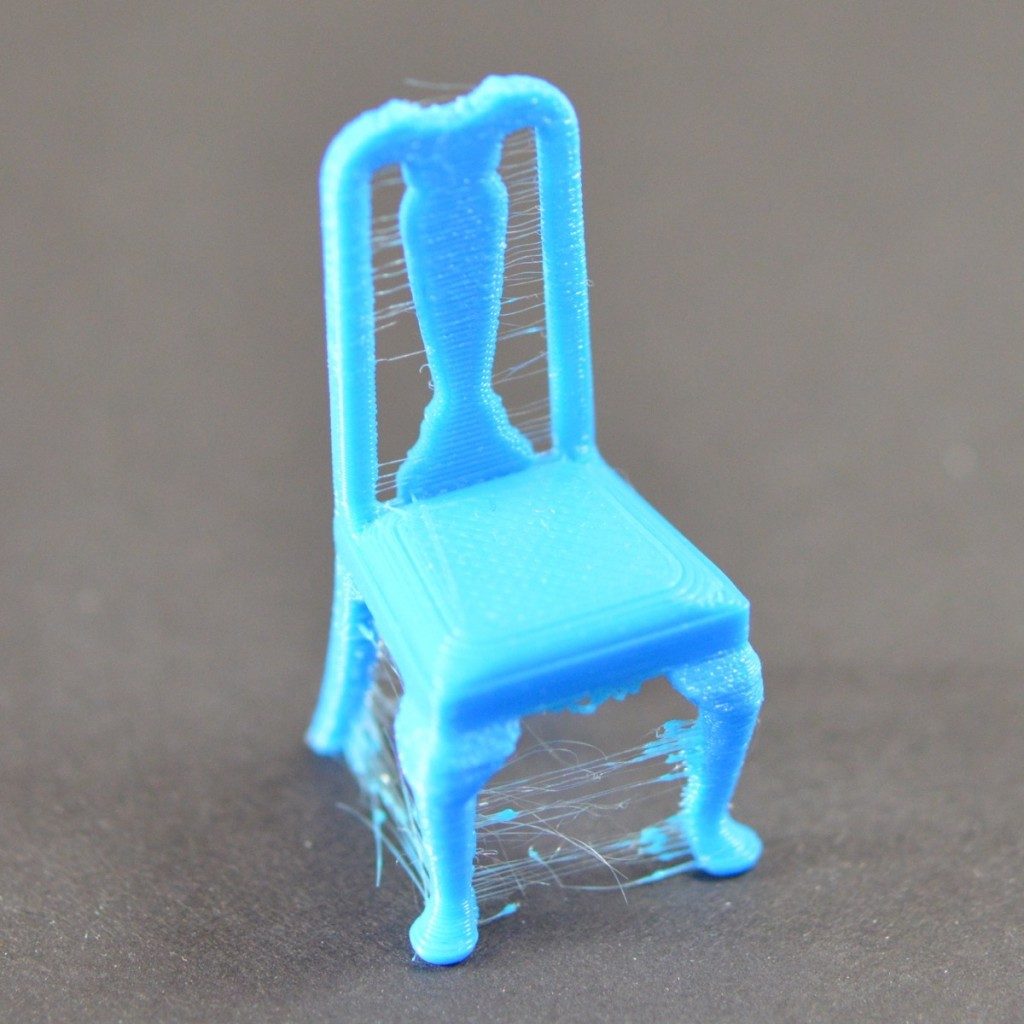
Stringing or Oozing
Lots of strings and hairs left behind when moving between different sections of the print