Working with File Types
This introductory tutorial will help you understand how different file types are used in Simplify3D. There are several different files used for 3D printing (.stl, .fff, .gcode, .factory, etc.), so we’ll start at the beginning of your workflow and explain when each file type is used. You will also learn how to export and save these different file types.
3D Model Files (STL, OBJ, 3MF): Output from CAD Software
 The first step in the Simplify3D workflow is to import the 3D model that you want to print. This file is typically exported from a CAD program or downloaded from a website that provides 3D design files such as Thingiverse, MyMiniFactory, Cults3Dor YouMagine. The most common file type for these 3D models is the STL (STereoLithography) file, but Simplify3D also supports OBJ and 3MF files.
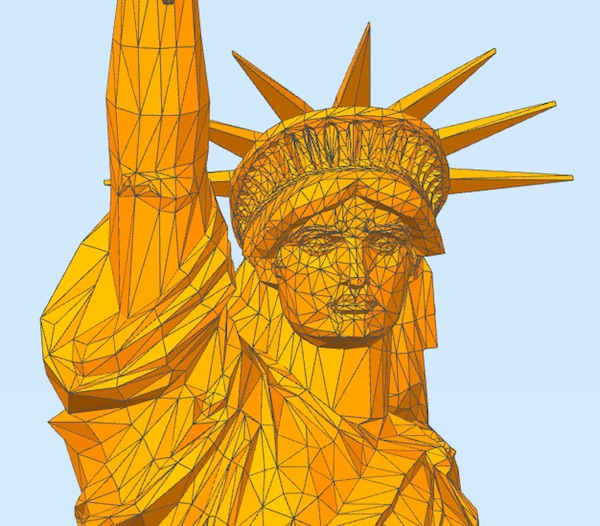
These files contain information about the 3D model you want to create. They define the boundary and shape of your 3D model using hundreds of triangles that define the surface of the part. You can actually view these individual triangles in Simplify3D by importing your model and then going to View > Wireframe.
FFF Files: How Your Model Will Be Printed
After you import your 3D model, the next step is to configure the settings that determine how the part will be sliced and printed on your machine. You can do this by clicking “Edit Process Settings” in the main Simplify3D window. Simplify3D makes it easy to load different settings for different printers or to save custom settings so you can reload them later. To view more information about how to save and modify these settings, please view our video on Managing Printer Profiles.
Simplify3D saves each of these printer profiles as a FFF file. You can view this file by going to File > Export FFF Profile, and then selecting the profile you want to export. The FFF file is a plain-text XML file, so you can easily open this file in a text editor if you are curious about what is being saved.
Toolpath Files (GCODE, X3G, MAKERBOT, 3W, G3DREM, BFB): Instructions for Your Printer
When you are ready to start printing your files, Simplify3D will “slice” your 3D model into hundreds of thin layers. It will then generate the exact instructions for each layer so that your printer knows how to construct that portion of the model. All of these instructions are combined into a single toolpath file that tells your printer where to move, how fast to move, how much plastic to extrude, what temperature to use, etc. You can then transfer these toolpath files to your 3D printer to begin printing.
 There are many different toolpath file formats that exist, as many of the machines that are available use a unique format for these instructions. The GCODE file is the standard file format that most users will be familiar with. This is a plain-text file, where each line in the file represents a new command for your 3D printer. If you want to learn more information about the commands that exist in this file, be sure to review our 3D Printing G-Code Tutorial.
Thankfully, if your printer uses a different file format, Simplify3D makes it easy to create these other files as well. For example, if your printer uses X3G files, Simplify3D will export both a GCODE and X3G file when you are ready to begin printing. This way you have the standard GCODE file which shows the plain-text instructions that are used for the print, as well as the binary X3G file that your printer needs. The same would apply to any other file format (MAKERBOT, 3W, G3DREM, BFB, etc).
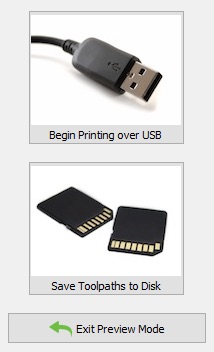
When you are ready to create these toolpath files in Simplify3D, click “Prepare to Print”, and your model will be sliced into the individual layers and toolpath instructions. You will be able to inspect a realistic preview of these instructions so that you can see exactly how your part will be constructed. When you are satisfied with the preview, you have two options: 1) Begin printing over USB, or 2) Save Toolpaths to Disk. If you choose to print over USB, there is no need to save a copy of your toolpath files, as you will be streaming this information directly to the printer. You can click “Save Toolpaths to Disk” if you want to export these files onto your local hard drive or transfer to your printer’s SD card.
Factory Files: A Combined File to Retain Your Simplify3D Project
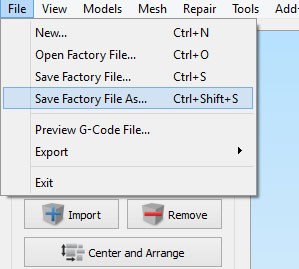 Simplify3D offers a unique way to save all the information about your project into one comprehensive file, known as a “Factory File”. The Factory File contains a copy of the 3D models that were imported, their position on the bed, your process settings, and even any custom support material that was added. You can export this file by going to File > Save Factory File As.
Whenever you exit Simplify3D, the state of the application is automatically saved so that you can easily resume where you left off the next time you open the program. There is no need to save a Factory File each time you close and reopen the program. However, there are other times you may want to save this file such as sharing your project with a coworker or creating a back-up for personal use.
Now that you understand the different file types associated with using Simplify3D, you’re ready to get started!