Printing with Multiple Extruders
In this tutorial, we will address the different ways you can use multiple extruders within the Simplify3D Software. The first section of the tutorial is focused on using the Dual Extrusion Wizard, and the second portion discusses how to customize extruder choices in order to use another extruder to print support structures, rafts, infill, and more. An additional section is also included to describe the changes needed to print with 3 or more extruders.
Printing Multiple Parts with the Dual Extrusion Wizard
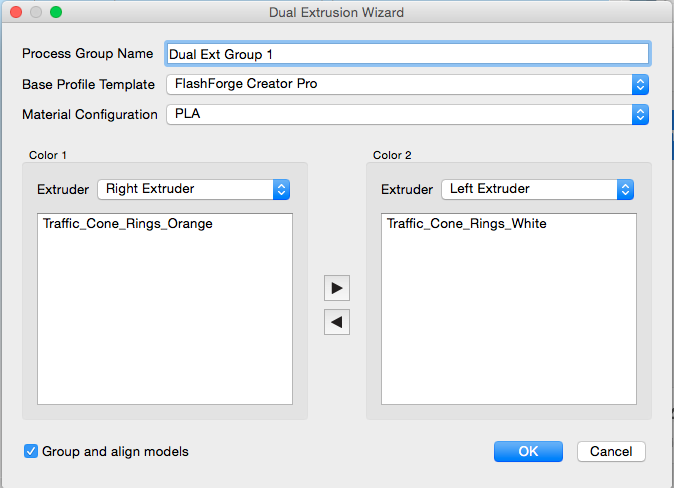 The Dual Extrusion Wizard makes it extremely easy to set up a dual extrusion print. To get started, go to Help > Configuration Assistant and ensure that your printer profile is loaded. If you already selected your printer profile when you started the software for the first time, you may skip this step. Next, import the models you would like to dual-extrude into Simplify3D. For this example, we will be using CocoNut’s traffic cone model. Then, go to Tools > Dual Extrusion Wizard and configure your settings:
- Process Group Name: This will be the name of your Grouped Processes.
- Base Profile Template: Select the printer from the list with which you will be dual-extruding. If you do not see your printer, go to Help > Configuration Assistant and load your printer profile into the software.
- Material Configuration: Select the material that you will be using to print, which will apply to both extruders. The default options are PLA, ABS, Nylon, PVA, and PLA (right)/PVA (left). We also encourage you to create custom Material Configurations. Simply click the plus icon next to Auto-Configure for Material in the FFF Settings Window to set up your own material settings.
After you press OK in the Dual Extrusion Wizard, the software will automatically create two grouped processes. When two or more processes are grouped together, settings with the same value across all grouped processes will be linked together so that any subsequent change to these settings on one process will automatically apply to the rest. Settings that were different before the processes were grouped will remain different. For instance, after running the Dual Extrusion Wizard, the corresponding grouped processes will have the same infill percentage; therefore changing the infill percentage in one process will change it for both processes. If you’d like to edit a setting for only one of the processes, you must ungroup the processes first (Edit > Ungroup Selection). If you want to learn more about this topic, feel free to review our Grouped Process video for more information.
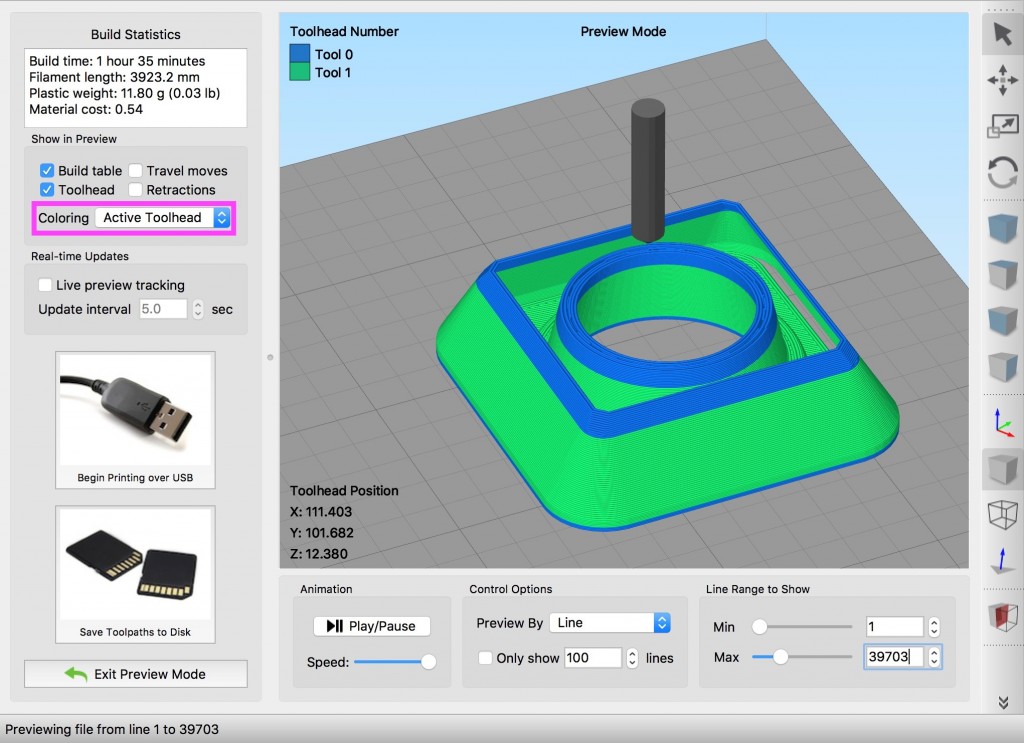 Selecting Prepare to Print! will slice the models and load the G-Code previewer. When viewing the G-Code previewer, it is advised to set the Coloring option to “Active Toolhead” to be able to see the G-Code previewer colored correctly. By default, profiles set up for dual extrusion will have the Ooze Shield feature enabled. This will help ensure that leaking and oozing during the print will wipe off on the shield rather than your models. If you’d like to adjust the Ooze Shield settings or enable other features such as the Prime Pillar, exit the Preview and select Edit Process Settings on your group and then click the Additions tab.
Printing Support, Infill, or Rafts with Another Extruder
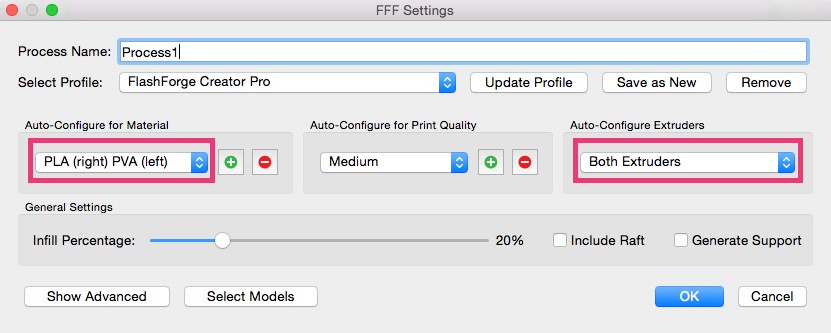
Within Simplify3D, you can also setup a print that has a different extruder for the support, infill, rafts, or perimeters. This workflow is different from the Dual Extrusion Wizard, as it only requires one Process. To get started, click Edit Process Settings to open the FFF Settings window. Make sure to change the Auto-Configure Extruders option to “Both Extruders”, as you will want to make sure both of your extruders are primed and ready. You can also verify that you have the correct material combination selected in the Auto-Configure for Material dropdown.
Now that the Auto-Configure options are set, we can define which extruder will be used for each part of the print. To do this, click on Show Advanced to see the detailed process settings. You can then click on the Layer, Additions, Infill and Support tabs to change the extruder that is used for different parts of the print. This allows you to customize the extruder that is used for all of the features listed below:
- Primary Extruder (used for the perimeters and outer solid layers)
- Skirt
- Prime Pillar
- Raft
- Ooze Shield
- Infill
- Regular Support Structures
- Dense Support Structures
For each item, click on the appropriate tab to view the settings and then choose the extruder you want to use from the drop-down list.
Printing with Three or More Extruders
To set up a multi-material print using three or more extruders, you will need to create a separate process for each extruder. Within each process you can choose what models will be printed with that color or material. For this example we will be using the Tricolor Traffic Cone model.
The first step is to import all the models required for your print. After importing the models, you may notice that they are not aligned correctly. To position the parts in the proper place you will need to select all the models and go to Edit > Align Selected Model Origins. If you want to group the models so that they stay locked relative to one another, just select all of your models and then go to Edit > Group Selection.
The next step is to create a separate process for each Extruder. You can click the “Add” button to continue adding new processes until you have the desired amount. Make sure each process is set up for the printer you are using and then click “Edit Process Settings” and perform the following steps:
- Click on Select Models to choose what models you want to print with this process.
- In the Auto-Configure Extruders dropdown, select the “All Extruders” option to make sure all extruders are heated at the beginning of the print.
- For this example we will use Extruder 1 for the first process. In the Layer Tab, select Extruder 1 from the Primary Extruder drop-down list. Do the same for the Infill Extruder option found in the Infill tab.
- If your model needs supports, go to the Supports tab and select the extruder that has the material you want to be used for supports.
To add the second and third extruders you will need to repeat steps 1-4 for each additional process.
Now that the print is properly set up, click on “Prepare to Print” and use the preview to make sure each part is assigned to the correct extruder. If you see any warnings, have a look through the Troubleshooting section below. You are now ready to begin printing with three or more extruders!
Troubleshooting
Receiving a warning when slicing: “The selected process is not configured for the number of extruders you have chosen to use. Are you sure you want to continue?”
This warning is generally caused by having the Auto-Configure for Extruder choice set to a single extruder instead of the “Both Extruders” pre-configuration. Changing to the “Both Extruders” auto-configuration, then configuring your extruder choices, will generally help.
Not seeing your printer in the Dual Extrusion Wizard/Configuration Assistant.
To create a profile for your printer, please select the option for “Other” in the Configuration Assistant and then enter in your machine profile. Using this custom profile, you can set up your print using the second portion of this tutorial (on how to print a feature with a different extruder). Please feel free to contact our support staff if you need further assistance setting up your printer profile for the Dual Extrusion Wizard.
Additional Dual Extrusion Settings
Tool Change Retraction
During a Tool Change, a Tool Change Retract pulls back filament to prevent oozing while it’s not printing. To adjust these settings, go to the Advanced tab of the FFF Settings window.
- Tool Change Retraction Distance: How far to retract filament in the extruder that has just finished printing and reaches a tool change.
- Tool Change Extra Restart Distance: This will be added to the length of filament that is primed. For instance, if the Tool Change Retraction Distance is set to 12 mm, and the Extra Restart Distance is set to -.5, then the prime distance to reactivate the extruder will be 11.5 mm of filament.
- Tool Change Retraction Speed: This will set the speed for the retraction and prime for tool change retractions.
Ooze Shield
When printing with multiple extruders, using the option for an Ooze Shield is highly recommended; in fact, it is enabled by default for dual extrusion profiles. To use the Ooze Shield, enable it in the FFF Settings Window under the Additions tab. It is recommended to use the same settings for both processes.
- Ooze Shield Extruder: Which extruder will be used for the Ooze Shield. Selecting All Extruders is recommended.
- Offset from Part: How far from the part the Ooze Shield will be. 2 mm is recommended.
- Ooze Shield Outlines: How many outlines the Ooze Shield will have. If you have two extruders and two outlines set for this setting, two outlines will print.
- Sidewall Shape: Vertical will go directly vertical from the base of the Ooze Shield. Waterfall will flow similar to how a waterfall would flow off the model as if pouring water directly down on the model. It will branch outward but will not come back inwards. However, Contoured sidewalls follow the shape of your print, even if that means they are smaller at the bottom than at the top.
- Sidewall Angle Change: This is the maximum overhang angle at which the Ooze Shield will print in Contoured or Waterfall mode. It is recommended to use a more conservative overhang angle than for standard support material printing.
Prime Pillar
The Prime Pillar can be very helpful for extruders that use multiple filaments through one nozzle. The Prime Pillar will be the first thing printed when changing nozzles. This will ensure that the nozzle is primed and ready to print before it continues the print.
Once you master these settings, you’ll be able to print high-quality multi-colored models using dual extrusion!