Simplify3D™ and the Makerbot® Replicator® 2
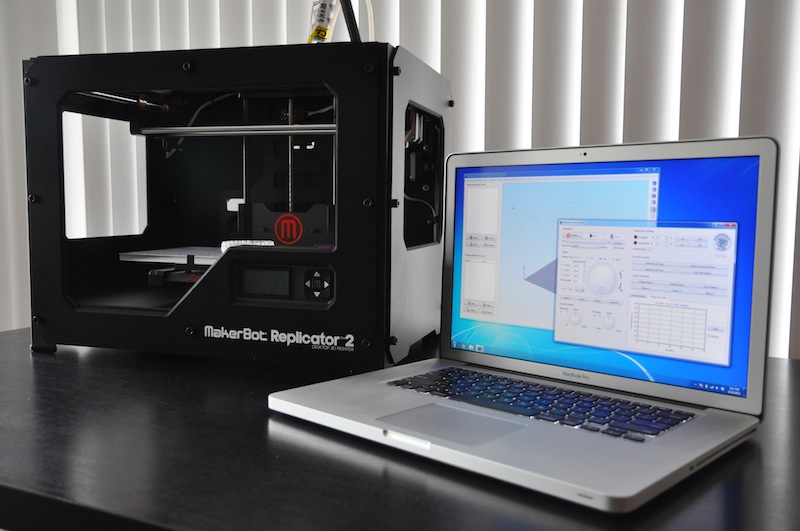 This page will help you set up your new Makerbot® 3D printer to use the All-In-One 3D printing software by Simplify3D™. The Replicator® line of 3D printers has been incredibly successful for Makerbot®. The Replicator® 1 was released in January 2012, the Replicator® 2 in September 2012, and finally the Replicator® 2X experimental printer in January 2013. The printer comes with an integrated LCD interface as well as an onboard SD card that makes printing a piece of cake. If you are setting up a brand new Replicator 3D printer, make sure to read the User Manual that comes with the printer. This describes the unboxing and final assembly including installing the filament guide tube and filament spool holder. You can also download an electronic copy of the User Manual directly from Makerbot’s Support Page. The remainder of this page is written specifically for the Replicator 2, but the same process can be applied to the other Makerbot-style printers like the Replicator 1, Replicator 2X, MBot Cube, Flashforge Creator, etc.
Final Hardware Checks
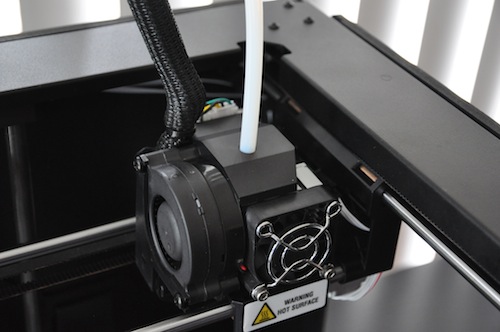 Before we dive into the software, there are a few final hardware checks you should perform before using your Replicator 2. If you’re confident your printer is ready to go, you can jump directly to the Software Setup Instructions. The Replicator 2 comes with several additional pieces you will need to install before performing your first print. These are also described in Makerbot’s User Manual as mentioned above. The two important items of interest are the filament guide tube and the filament spool holder. The filament guide tube plugs into the extruder body and then attaches to the rear of the Replicator 2.
The filament spool holder has a tab that can be inserted into the rear panel of the machine. The filament spool will then rest on this part allowing it to spin freely and continue to feed filament during normal operation. This sounds easy, but we found that the filament spool holder supplied with our machine was not ideal, even for the included PLA filament spool. The spool holder was a bit too wide and actually created too much friction with the provided spool. The machine was originally plagued with constant extruder clicking during high-speed printing, which was eventually traced back to this increased friction. Thankfully, there is an abundance of Replicator 2 upgrade parts available and we were able to resolve this problem by replacing the stock filament spool holder with whpthomas’ revised design (http://www.thingiverse.com/thing:38439).
The last thing to do is to power on your Replicator 2 by plugging in the included power cord and flipping the switch on the rear of the unit. The first time you do this, the build-in LCD menu will automatically run the included startup script that will walk you through the process of leveling your build plate and feeding your PLA filament into the extruder. Once this setup process is complete, you’re ready to start printing!
Software Setup
The Makerbot Replicator 2 uses the x3g file format for printing. This is a binary file that the machine reads which contains all of the instructions for printing. The software can be set up to output this file format directly thanks to it’s integrated support for the Makerbot printers. The output x3g file can then be printed in two ways. You can copy it to the machine’s SD card and use the built-in LCD menu or you can stream the file directly to your machine via a connected USB cable.
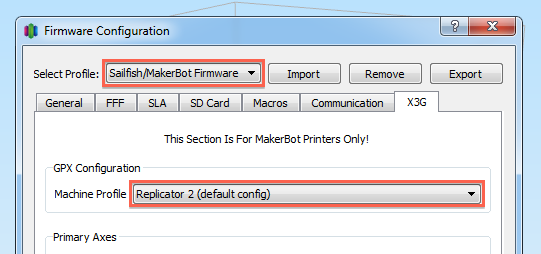 The first step in this process is to configure the software to speak the same language as your Makerbot. You can do this by opening the Simplify3D software and going to Tools > Firmware Configuration. Select the included Sailfish/Makerbot firmware profile from the drop-down list. This will allow the software to work with both the stock Makerbot firmware and the common Sailfish firmware upgrade (which you can read more about here). In this same window, click on the X3G tab and select the correct machine profile (in this case, the Replicator 2).
At this point, you are ready to import an STL file and start configuring your slicing settings. The software includes a Quick Start Guide that describes this basic procedure. This guide can be found at any time by going to Help > Quick Start Guide from within the program.
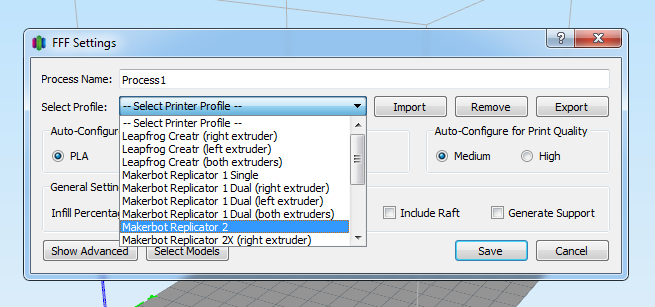 Page 5 of the Quick Start Guide describes the process of adding a new FFF process and configuring your slicing settings (FFF stands for Fused Filament Fabrication and is the industry name for the type of 3D printing that your Makerbot uses). If you have a Replicator 1, 2, or 2X we make this process extremely simple. The software already includes pre-configured profiles specifically for these machines. All you need to do is select it from the Select Profile drop-down menu. If you are using an older machine like the Thing-O-Matic or Cupcake CNC, please jump to the Using a Different Makerbot Printer section.
Starting a Print!
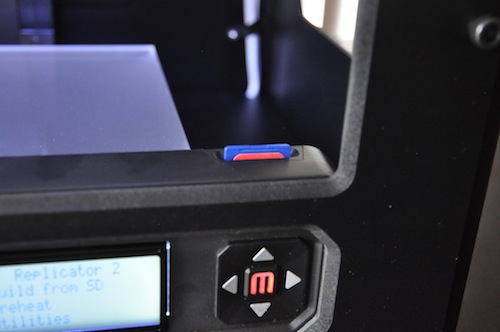 Once you are happy with your FFF settings, you can press the Prepare button to create the machine instructions required for printing. Please make sure that the filename does not exceed 30 characters. The software will create 2 files in the location that you specify. One of these files is the binary x3g instructions that you will use for printing on the MakerBot (.x3g). The other file is standard ASCII G-Code (.gcode) which can be animated using the built-in Previewer. This allows you to see what the print will look like before actually running it on your machine. If you are happy with the build preview, you have two options to begin printing. First, you could simply copy the output .x3g file to your Replicator 2’s SD card. Plug the card back into your machine and then use the built-in LCD menu to select “Build from SD” and choose the file you wish to print. The second option is to use the software’s built-in Machine Control Panel. You can find this window by going to Tools > Machine Control Panel. The .x3g file you just prepared should be listed in your G-Code library along with the estimated print time and filament usage. Select the line item you wish to print and choose “Run Selected G-Code”.
Congratulations! You’ve reached the end of the guide and you are now ready to start making things using the Simplify3D software with your Makerbot 3D printer! If you have further questions feel free to contact our technical support staff and we will be happy to assist you.
Troubleshooting
If you run into problems during your first print, here are a few common troubleshooting tips you can try.
- Please make sure that the filename you choose when clicking the Prepare button is less than 30 characters. Note: You cannot simply rename the file to something shorter, you must export it a second time from the software using the shorter name.
- If you are using a Windows computer, please make sure that you have installed the necessary MakerBot Mightyboard drivers. If you have already installed MakerWare or RepG, you do not need to worry about this.
- If you have MakerWare installed on your computer, please make sure that the Conveyor service is disabled before trying to connect to your printer using the Simplify3D software. You can do this by opening MakerWare and going to Services > Stop Background Service.
Using a Different MakerBot Printer?
If you are using an older printer like the Thing-O-Matic or the Cupcake CNC, there are only a few additional changes you will need to make. To begin, it is a good idea to select the included Replicator 2 profile as a starting point. It is very similar to some of Makerbot’s earlier printers so it will save you some additional configuration. The next thing you will need to do is click the “Show Advanced” button on your FFF settings window. This will display some of the more detailed settings that we offer.
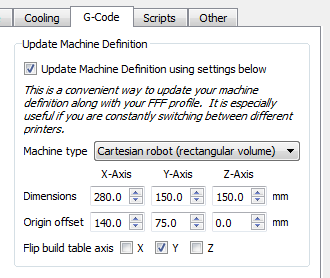 Many of Makerbot’s earlier printers had a much smaller build volume than the latest Replicator lineup. If your machine has different X/Y/Z dimensions, you will need to change them on the “G-Code” tab of your FFF Settings window. The X/Y/Z dimensions for the “Update Machine Definition” section will need to be updated to match your machine. Most Makerbot printers also place the coordinate system origin in the center of the build platform. In this case, you should also update the X and Y origin offsets to be half the X/Y dimensions. For example, if your machine has a 100x150x200mm build volume, you would want the origin offset to be 50x75x0mm. The virtual build table in the software will be updated to match the settings you specify here.
The last thing to do is to edit the starting and ending G-Code scripts so that they work with your particular setup. For example, the Replicator 2 starting G-Code script uses a special position just slightly off the edge of the build plate which allows the nozzle to be primed without getting plastic all over the build plate. The behavior in these scripts is specific to each individual machine and will need to be updated accordingly. You can find these settings on the “Scripts” tab of your FFF Settings. If you have questions about this process, feel free to contact our support staff and we will be happy to walk you through it.