MakerBot 5th Generation
This guide will help you set up your MakerBot® 5th Generation printer to use with All-In-One 3D printing software by Simplify3D® . The first 5th Generation model was released in early 2014. The 5th Generation printers are sold throughout the world and are extremely popular printers, with many distinct features.
Simplify3D creates .MakerBot files that the MakerBot 5th Generation printer requires. This means that you can send the files directly over through Simplify3D or you can save these files to your computer. Once saved to disk they can be placed on an SD card if your printer has an SD card slot (Replicator and Z18), or you can route these Simplify3D-generated files through MakerBot Desktop and print them via WiFi.
To route Simplify3D-generated .MakerBot files through MakerBot Desktop, you would simply open MakerBot Desktop software and go to File > Print from File then select the .MakerBot file.
| Simplify3D .MakerBot files | SD Card Printing | Wifi Printing | USB Printing |
|---|---|---|---|
| MakerBot® Mini | N/A- No SD slot | Yes-MakerBot Desktop* | Yes |
| MakerBot® Replicator | Yes | Yes-MakerBot Desktop* | Yes |
| MakerBot® Z18 | Yes | Yes-MakerBot Desktop* | Yes |
*MakerBot Desktop version 3.3.0.23 allows for importing of Simplify3D-generated .MakerBot files.
Final Hardware Checks
Before you start your first MakerBot 5th Generation print using Simplify3D Software, here are a few steps to make sure that your 5th Generation printer is ready for printing.
Please confirm that all cardboard and packaging materials are removed from the inside of the printer and check that all packaging is removed. Please ensure the roll of filament is properly secured in its location and is routed through the plastic tube. To load the filament, please see below for the Simplify3D Printing section.
Simplify3D Printing
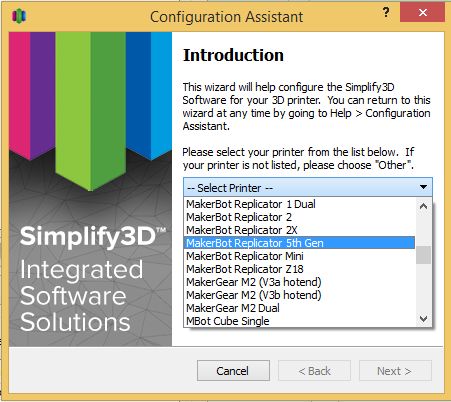 The first time a user starts Simplify3D they are greeted with a Configuration Assistant, that will greet the user with a list of printers. The 5th Gen Replicator, the Replicator Mini, and the Z18 are all available choices on this list. If this is not your first time opening the software, please go to Help > Configuration Assistant and then select your printer.
If you are attempting to connect your printer to Simplify3D it is very important to turn off MakerBot Desktop Services, you can either do this in MakerBot Desktop under the Services tab or using a task manager; end the process for MakerBot Software.
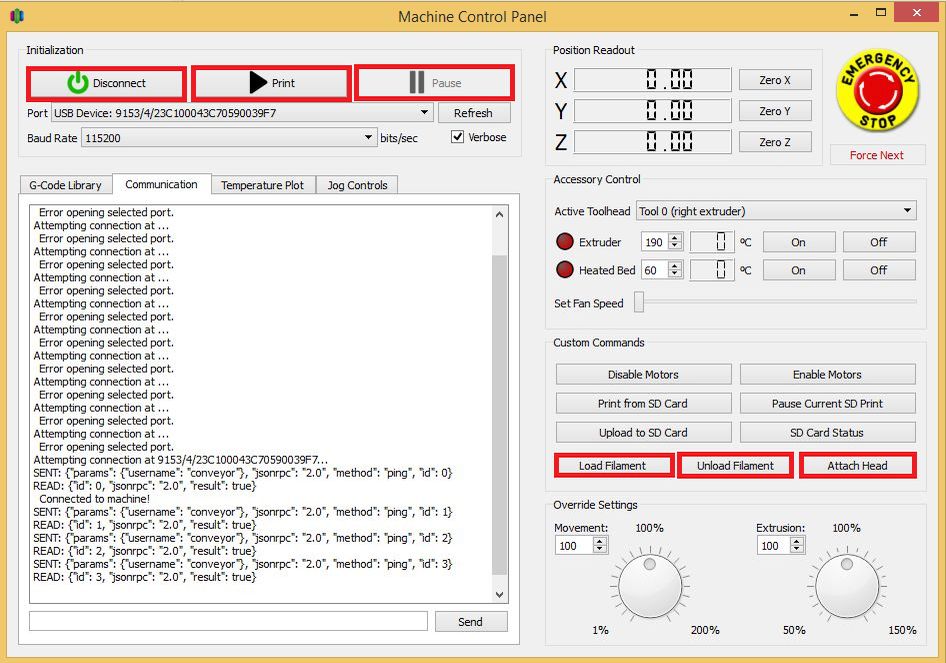
To load or unload filament in Simplify3D software, please go to Tools > Machine Control Panel. In the Machine Control Panel there are buttons specifically for the 5th generation machines to to load filament/unload filament as well as reattach the extruder head if it falls off during a print. These commands as well as the other 5th generation compatible commands are highlighted in red. Note that many of the jogging commands for manual control are not compatible with the 5th Generation firmware.
 Once the printer of choice has been selected in the Configuration Assistant and you’ve loaded/unloaded filament as needed you will be ready to print. From here, you may import 3D models and configure your processes. For more information on the many different features Simplify3D has in its process configuration, please see our tutorials page. These tutorials will detail many features in Simplify3D, such as customizable support structures, different settings for different parts on your build plate, or even different settings for different regions of a model.
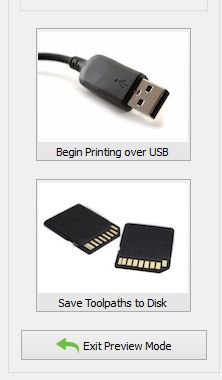 Once you’ve sliced a model with your customized settings, you have the option to print over USB or to Save Toolpaths to Disk. When saving toolpaths to disk, it will automatically create a .MakerBot file when saving the .Gcode file. This .MakerBot file can be placed on an SD card or using MakerBot Desktop can be routed through their software by simply going to File > Print from File and selecting the Simplify3D-generated .MakerBot file.
If you have any questions about the MakerBot 5th generation printer and Simplify3D, or any other questions about the software in general, please feel free to contact our support at Support@Simplify3D.com.
My Extruder is Jammed?
In our testing, we’ve found that the 5th generation extruders (Smart Extruders TM) will occasionally become jammed/clogged. The Mini, the 5th generation Replicator and the Z18 all use the same extruder design, so the following tips on removing an extruder jam/clog apply to all three printers. The steps and pictures below will show you how to completely disassemble the Smart Extruder.
When disassembling the extruder, it will quickly become apparent where the filament is clogged. Our photographs show an empty extruder to keep these instructions as general as possible. This disassembly sequence is recommended for users who have moderate to advanced experience with electronics. In addition, refer to your warranty pages before working on your hardware. If you are unsure about taking apart your Smart Extruder for warranty reasons or would like to have it professionally replaced, we advise you to contact MakerBot Industries.
For safety, ensure the extruder has cooled down and is at room temperature.

Step 1 – Unlatch the plastic latches on the bottom of the Smart Extruder

Step 2 – Unlatch the plastic latches on the top of the Smart Extruder

Step 3 – Unlatch the latches on the side housing panel of the Smart Extruder

Step 3 – Unlatch the latches on the side housing panel of the Smart Extruder

Step 5 – Loosen the screw and remove the spring-tensioned pieces

Step 6 – Remove the metal heat-fin from above the extruder block

Step 7 – Remove the metal protection from the extruder nozzle
Why can’t Simplify3D connect to my printer?
If you are attempting to connect your printer to Simplify3D, it is very important to turn off MakerBot Desktop Services. You can either do this in MakerBot Desktop under the Services tab or by using a task manager; end the process for MakerBot Software.
Using a Different MakerBot Printer?
Please see our setup guide for the MakerBot Replicator 2 which also covers earlier models such as the Thing-O-Matic or the Cupcake CNC machines.