Simplify3D™ and the Leapfrog Creatr
 This page will help you setup your new Leapfrog® Creatr to use the All-In-One 3D printing software by Simplify3D™. The Creatr is available in a single extruder model and in a dual extruder model. If you are setting up a brand new Creatr, make sure that you have completed the Installation Guide on Leapfrog’s website. It will guide you through the unpacking your Creatr and the installation of your first spools of filament.
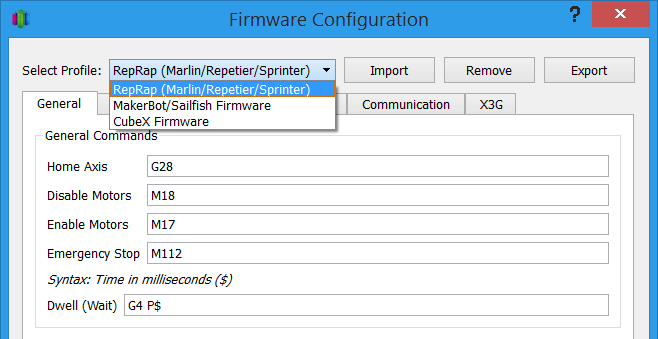 When you first open your software, you will be greeted by the virtual build plate and the main user interface. For now, let’s make sure that Simplify3D is set to the correct firmware configuration. By default Simplify3D is configured to the RepRap (Marlin/Sprinter) firmware, which is what the Creatr uses, but it’s always a good idea to double-check. To do this go to Tools > Firmware Configuration. The RepRap profile should already be selected.
Connecting to your Creatr
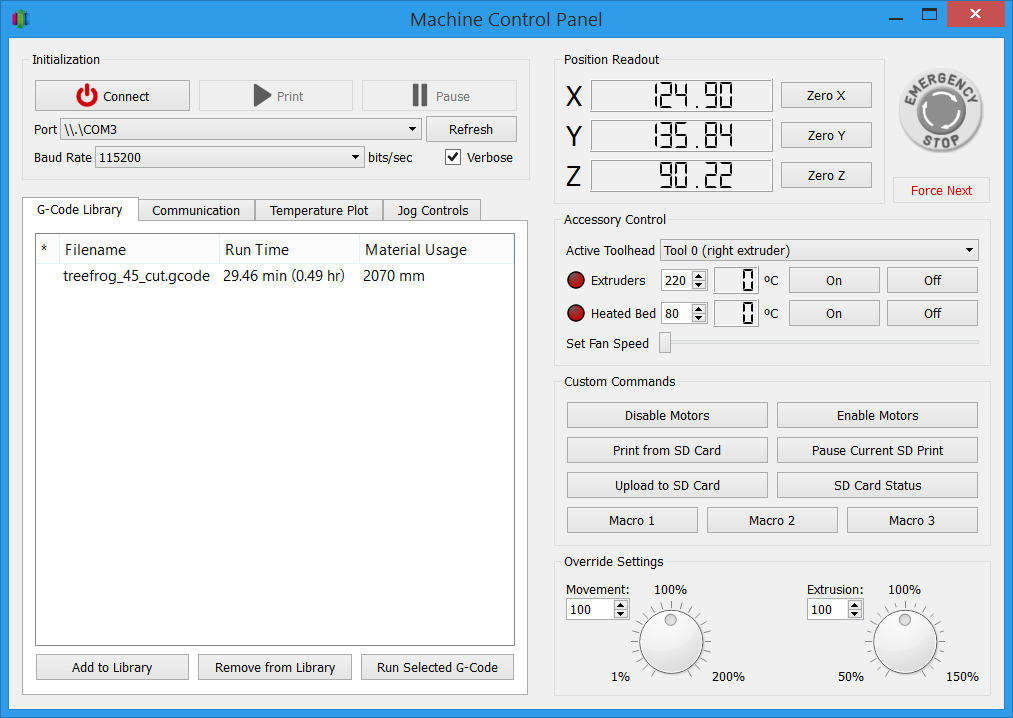 Now it’s time to connect to your Creatr! First connect the USB cable to your computer, then open the Machine Control Panel. To do this you can press Ctrl-P (Or Command-P on a Mac). You can also go to Tools > Machine Control Panel or click on the gear icon on the quick access toolbar. Next, you need to select the port that your printer will use to communicate to the software. After plugging in the printer, you may need to click the “Refresh” button for the new port to appear. On Windows, this is usually called COM#. Mac users will see multiple ports so be sure to select the one with USB in its name. You won’t have to change the Baud Rate, as the default setting of 115200 is correct. Once the correct port is selected, click “Connect”. If everything goes well the red connect button should turn green, which shows that you are now connected to your printer!
Controlling your Creatr
 Once you’re connected to your Creatr, you can use the Machine Control Panel to manually control your machine in preparation for printing. The first thing you might want to check is that your motors are all connected and working properly. To do this, click on the “Jog Controls” tab, which will bring up the jog control panel where you will be able to manually move the printhead. You can move in 0.1, 1, 10, or 100mm increments along any of the axes as well as retract or extrude the filament. Remember that you are always moving the printhead relative to everything else. For example, clicking one of the +Z buttons will move the printhead away from the build plate. For the Creatr, this means that the build plate will actually move down.
 Both extruders and the heated bed on the Creatr can also be controlled using the MCP. The red lights beside extruder and heated bed temperatures indicate when either of these heaters are turned on. You can select the right or left extruder through the “Active Toolhead” option. If you have followed the Installation Guide on the Leapfrog website, there should be ABS plastic mounted on the right extruder. For testing purposes, select the right extruder and enter “220” into the extruder temperature field and “80” into the heated bed field. When you press “On” for either the extruder or heated bed, the red circle should light up and your temperature should begin rising. Note that the heated bed will take longer to heat up than the nozzle.
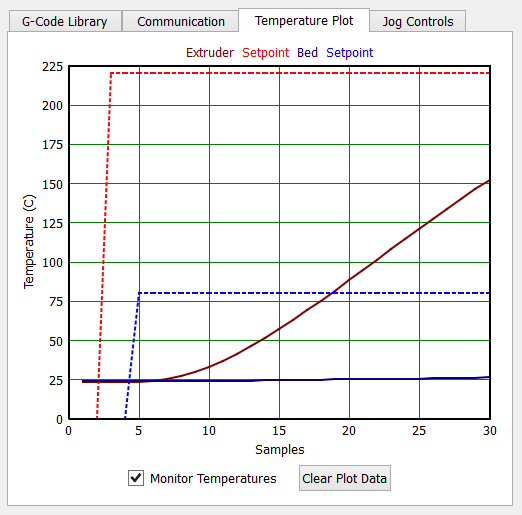 You can use the “Temperature Plot” tab to see a live view of the current temperatures on your Creatr. The red line indicates your extruder temperature and the blue line indicates your build plate temperature. The dotted lines indicate the desired setpoint temperatures. Before we try extruding from your nozzle, make sure the extruder temperature is heated up and stabilized. Go back to the Jog Controls tab and click on the 100mm extrude button. Watch the head extrude the filament. It is typically a good idea to preheat and prime your nozzle following these steps prior to beginning a print.
Starting Your First Print on the Creatr
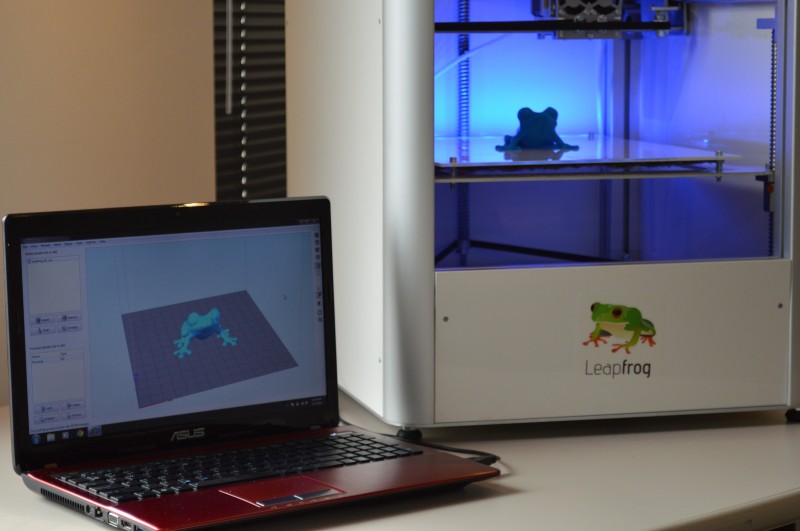
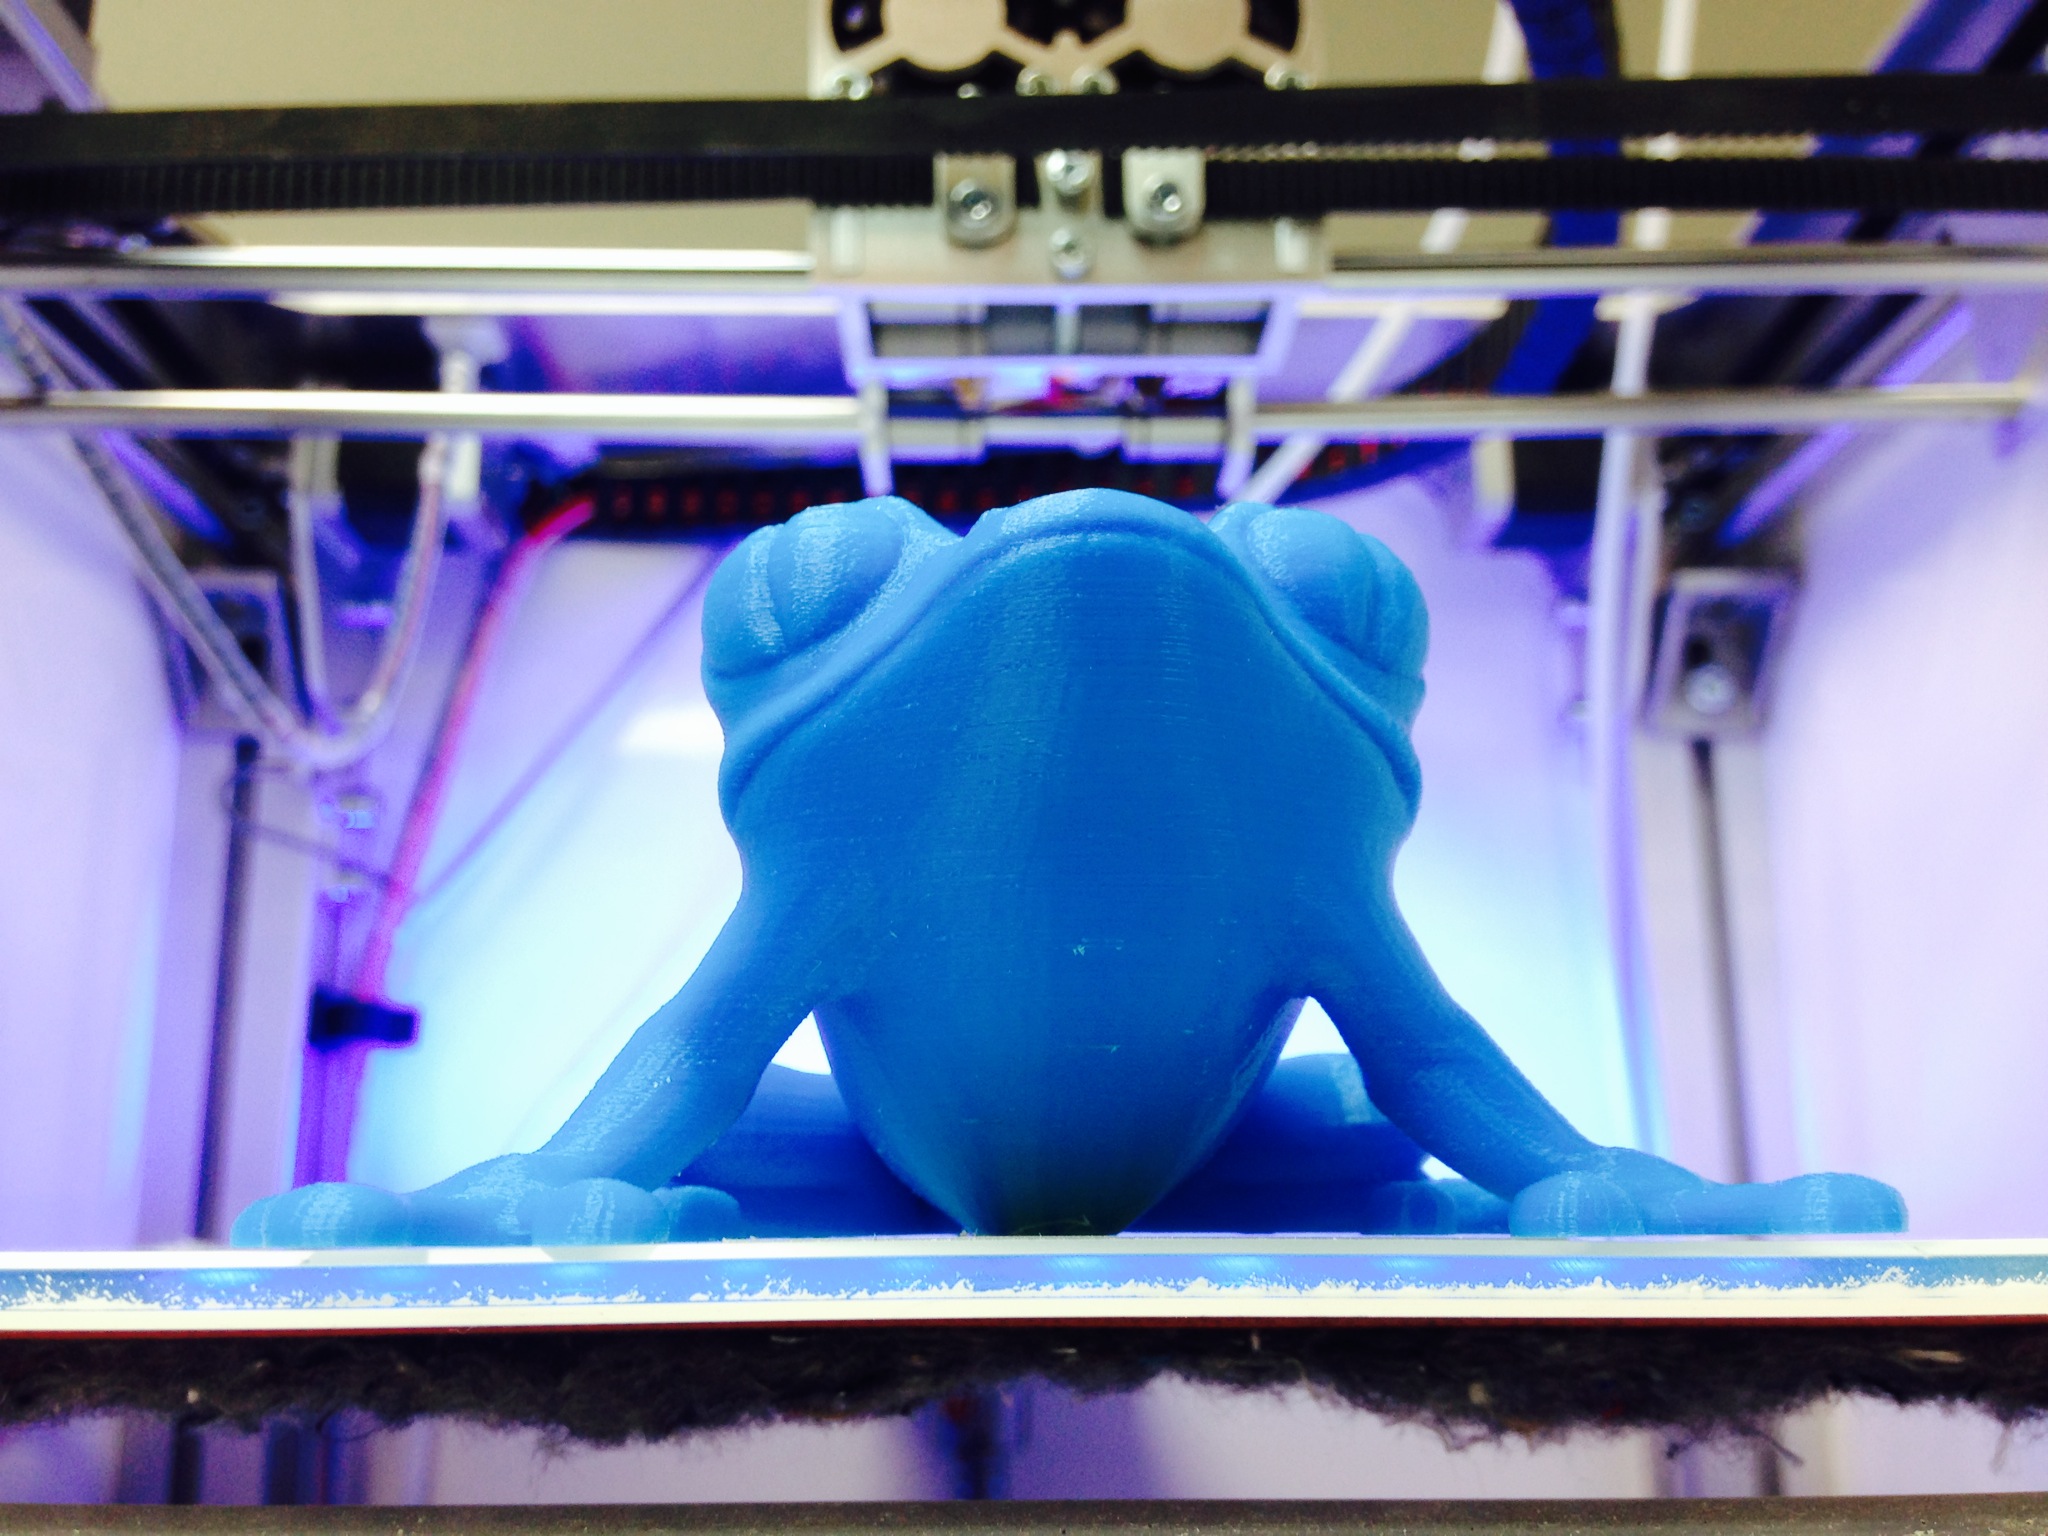
You are now ready to import an STL file! Lets start with something simple. Download this treefrog STL file by MorenaP and import it into the program using the “Import” button. Your frog will drop down into the software as a 3D model. The next step is to center the model by clicking on the “Arrange” button.
Now you can start configuring your slicing settings by adding a process. If at any point you need some help, the software includes a Quick Start Guide that describes the basic procedures. To find it, go to Help > Quick Start Guide from within the program.
On page 5 of the Quick Start Guide is a tutorial on how to create and configure a new FFF process (FFF stands for Fused Filament Fabrication and this is the industry name for the type of 3D printing the Creatr uses). These FFF Settings determine exactly how the model prints and plays a critical role in the quality of your print. To create a new process you must click on the “Add” button. A process will pop up as “Process1” and the FFF settings window will emerge on your screen. For this simple part, you will only need one FFF process.
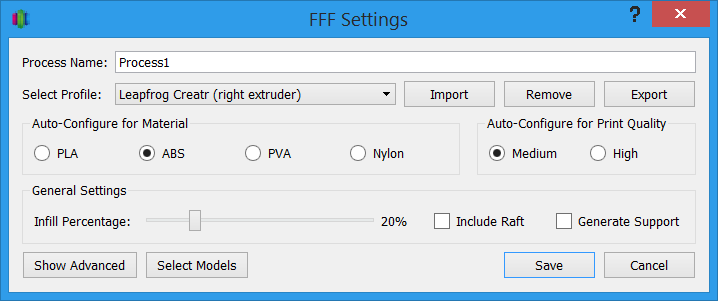 Simplify3D Software has made configuring settings extremely simple for Creatr users through the use of our pre-configured profiles. Select the ‘Leapfrog Creatr (right extruder)’ profile from the “Select Profile” drop-down menu and “ABS” for the “Auto-Configure for Material” container.
When you have finished changing your FFF settings, you can save them by clicking the “Save” button. After saving, press the “Prepare” button to create the machine instructions required for printing. The software will slice the part into a G-code file that the Creatr can read. The software will then prompt you to watch a preview of the print using our animated previewer. This will allow you to see what the print would look like before actually printing it on the Creatr.
 Once you are satisfied with how your part looks click the red stop sign to exit the previewer. A window will pop up and ask if you are ready to print. Select yes and the MCP will appear. The printer may pause for a few seconds to stabilize the temperatures before printing. Once the desired setpoints have been reached the print will begin. In no time at all you will have your first printed part.
Troubleshooting
If you are on Windows and have trouble connecting to the printer, please make sure that you have installed the appropriate drivers following Leapfrog’s instructions