Simplify3D™ and the Flashforge
 This page will help you set up your new Flashforge Creator Printer to use the All-In-One 3D printing software by Simplify3D™ (the same process can also be applied to the Wanhao Duplicator 4 or other MakerBot style printers).
The printer comes with an integrated LCD interface as well as an onboard SD card. Make sure to read the Flashforge User Manual that comes with the printer. This describes the unboxing and final assembly including installing the filament guide tube and filament spool holder.
Final Hardware Checks
Before we get started with the software, there are a few final hardware checks you should perform. If you’re confident your printer is ready to go, skip forward to Software Setup. The Flashforge comes with several screws that will need to be screwed in with a hex wrench before performing your first print. This process is described in Flashforge’s User Manual – link provided above. Two important items are the filament guide tube and the filament spool holder. The filament guide tubes plug into the extruder body and are held in place by two clips on the rear of the Flashforge. The filament spool holder is held in place by two large washers on the back of the printer.
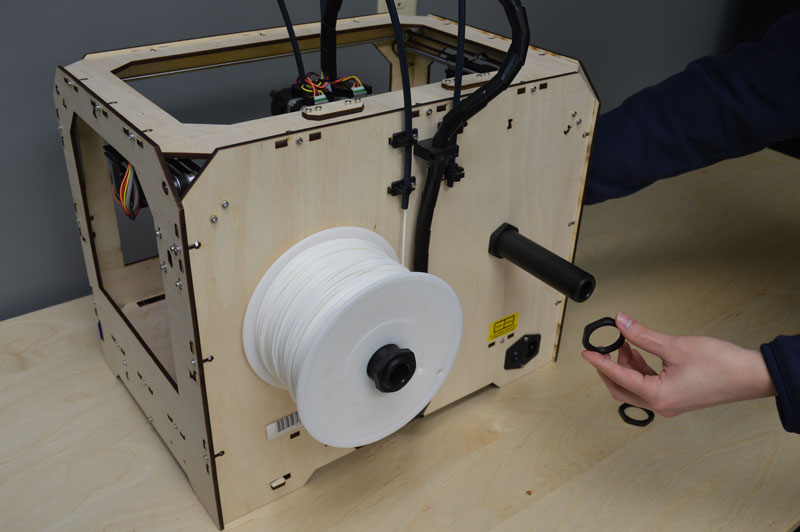 The filament spools will rest on the brackets to allow the filament to spin and feed freely during normal operation. The spool holders are easily installed by hand. There should be two spool tubes and six spool tube washers. First, screw one washer, flat side facing away from the center, into the end with more threads. Then, simply push the black tube through the hole in the back of the printer with the flat end of the washer resting up against the wall (the long end should be jutting out from the printer). Next, tighten one washer onto the tube from the inside of the printer. Repeat these steps for the other tube. Once finished you should have two washers remaining. You’ll be using them on the outer end of the tube when the filament spools are mounted to keep them in place.
Out of the box, Flashforge comes with two spools of ABS filament. When mounting them to your printer you will need to remember to orient the spools correctly. Facing the back of the printer, the spool on the left should be mounted so that it rotates counter-clockwise when feeding. Likewise, the spool on the right should rotate clockwise. When you have mounted the spools, remember to finally attach the two washers left over from the filament spool installation.
The last thing to do would be to power on your Flashforge by plugging in the included power cord and flipping the switch located on the rear left of the machine. The first time you do this, the built-in LCD menu will automatically run the included startup script that will walk you through the process of leveling your build plate and feeding your ABS filament into the extruder. You can also manually start the startup script by navigating to Utilities > Run Startup Script on the LCD screen. All of these hardware steps and startup sequences are explained in more detail in the Flashforge User Manual. At this point, you’re ready to start printing using Simplify3D!
Software Setup
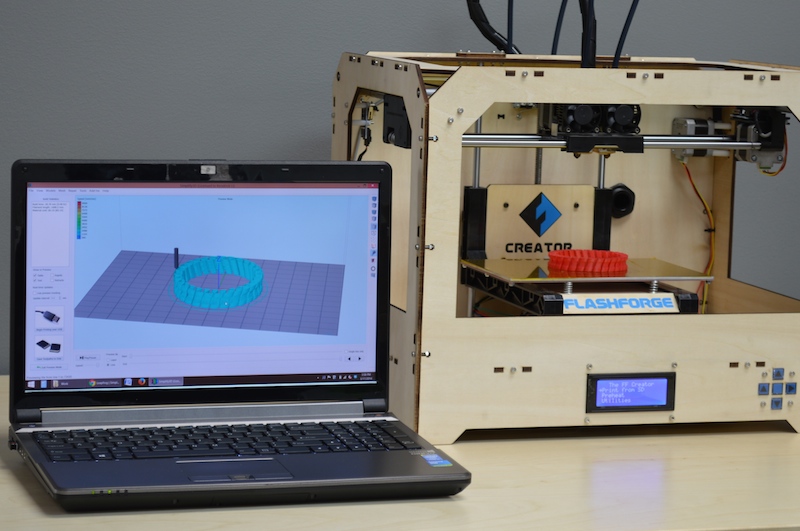
The Flashforge uses a x3g file format for printing. This is a binary file which contains all of the instructions the printer needs for it to print your part. The software can be set up to output this file format directly thanks to its integrated Makerbot printer support. The resulting x3g file can then be printed in two ways. You can copy it to the machine’s SD card and use the built-in LCD menu or you can stream the file directly to your machine via a connected USB cable.
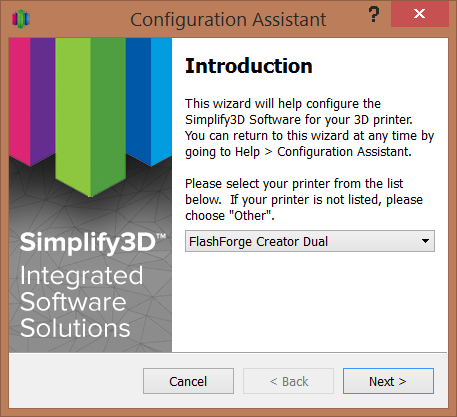
The first step in syncing the software with your Flashforge is to configure the software to speak the same language as your machine. You can do this by opening the Simplify3D software and going to Help > Configuration Assistant.
When the assistant window pops up, just select the correct Flashforge Creator profile for your printer under the drop down menu. You have successfully configured Simplify3D to work with your Flashforge printer!
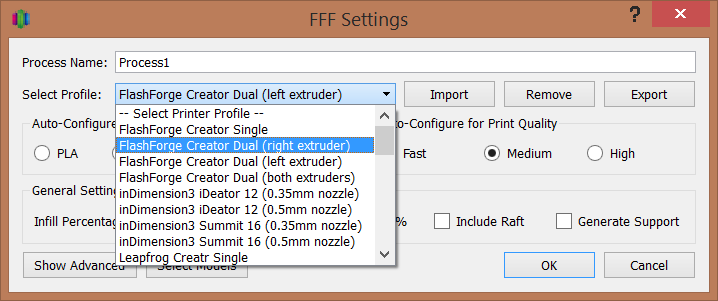
If you would like to manually change the firmware settings, you can go to Tools > Firmware Configuration. From here you can change the firmware profile and the general communication settings. For the Flashforge, you should select the ‘Sailfish/Makerbot Firmware’ profile. This will allow the software to work with both the Flashforge firmware and the common Sailfish firmware upgrade (read more about the Sailfish upgrade here). In this same window, click on the X3G tab and select the correct machine profile (if you have the Creator 1 select “Replicator 1 – dual extruder”; if you have the Creator 2 select “Replicator 1- single extruder”).
 You are now ready to set up your workflow. Select one of the Flashforge printer profiles in the drop-down menu. Import your STL file. Next, add the preconfigured Flashforge process or customize your own process settings. The software includes pre-configured profiles specifically for fast, medium and high-quality prints. Note: If you are not familiar with the basic printer workflow, refer to the Simplify3D Quick Start Guide that can be accessed from within the software at Help > Quick Start Guide.
Starting a Print!
Once you are happy with your print settings in the FFF window, click “Prepare to print!” to advance to the Preview stage. An important point for your Flashforge is that when the “Prepare to print!” button is pressed, the software creates two files. One of these files is the binary x3g instructions that you will use for printing on the Flashforge (.x3g). The other file is the standard ASCII G-Code (.gcode) file that creates the Preview animation.
We always advise that you view the Preview carefully to determine if your model appears the way you desire. If you are happy with the build sequence in the Preview, you have two options to begin printing.
- Print using the SD card. Simply click on the SD card picture labeled “Save Toolpaths to Disk” button and the software will copy the .x3g and G-Code file to the Flashforge′s SD card. You can then insert the SD card back into your printer and use the built-in LCD menu to select the “Build from SD” option. Select the file you wish to print and start printing.
- Print over a USB connection. When you plug the USB cable into your computer, the software will automatically connect with the printer. A pop-up message will let you know when you are connected. To print, click on the “Begin Printing over USB” button. Your machine will start receiving commands and relaying information back to the computer. The software will alert you of the progress of the print through the same pop-up message in the bottom right corner. For example, if the printer is heating the extruders, a “Preheating Extruder” message will appear with a loading bar. When printing over USB the Preview Mode will turn into a live tracking tool. This tool will track the machine’s motions so that you are able to watch your print’s progress on your computer. If you wish to change the update interval you can set it on the left side under “Real-Time Updates”.
Congratulations! You’ve reached the end of the guide and you are now ready to start making models using the Simplify3D Software with your Flashforge Creater 3D printer! If you have further questions feel free to contact our technical support staff and we will be happy to assist you.
Troubleshooting
If you run into problems during your first print, here are a few common troubleshooting tips you can try.
- Please make sure that the filename you choose when clicking the Prepare button is less than 30 characters. Note: You cannot simply rename the file to something shorter, you must export it a second time from the software using the shorter name.
- If you are using a Windows computer, please make sure that you have installed the necessary MakerBot Mightyboard drivers. If you have already installed MakerWare or RepG, you do not need to worry about this.
- If you have MakerWare installed on your computer, please make sure that the Conveyor service is disabled before trying to connect to your printer using the Simplify3D Software. You can do this by opening MakerWare and going to Services > Stop Background Service.
Upgrading to Sailfish
If you are trying to upgrade to Sailfish, here are some tips and suggestions.
- Make sure you follow all the instructions specified on Makerbot’s Sailfish installation guide. Also, don’t forget to complete Step 1 and 2 on the Sailfish setup guide. When you get to the ‘Installing the Sailfish Firmware’ portion of the guide and it asks for you to select the correct board, make sure to choose the FlashForge board.
- If the extruder is printing extremely far off to the left, make sure your home and extruder head offset is set correctly in the EEPROM. To do this, open up RepG and open up Onboard Preferences from the Machine menu.
- For the x home offset, you should have a value around 152mm.
- For the y home offset, you should have a value around 75mm (for dual extruders) or a value around 72mm (for single extruders).
- For the extruder offsets, you should have a value of around 32mm or 33mm. Alternatively, you can have a value of 0mm and the firmware will automatically set it to the default value.
- If the bot is printing off center to the left for the left extruder only, you can use this modified starting G-Code script to resolve the issue.
; **** Replicator 1 dual start.gcode****

M103 ; extruder off

M73 P0 ; enable build progress

M70 P2 (Simplify3D)

G162 X Y F3000 ; home XY maximum

G161 Z F1200 ; home Z minimum

G92 Z-5 ; set Z to -5

G1 Z0.0 ; move Z to 0

G161 Z F100 ; home Z slowly

M132 X Y Z A B ; load current position from EPROM

M135 T1 ; load left extruder offsets

G1 X70 Y-70 Z30 F9000 ; move to wait position off table

G130 X20 Y20 Z20 A20 B20 ; lower stepper Vrefs while heating

M70 P1 (priming nozzle…)

M6 T0 ; wait for right extruder to warm up

G130 X127 Y127 Z40 A127 B127 ; default stepper Vrefs

G1 Z0.4 ; position nozzle

M108 R5.0 ; set extruder speed

M101 ; start extruder

G4 P3500 ; purge nozzle

G1 X65 Y-65 Z0.15 F1200 ; slow wipe

M103 ; stop extruder

G1 X60 Y-60 Z0.2 F1200 ; lift

M73 P1 ;@body (notify GPX body has started)

; **** end of start.gcode ****
When you change the EEPROM settings, be sure to click on the ‘Commit’ button to save your changes. If you need to change all the settings back to default, press the ‘Reset Motherboard Completely’ button.