Multi-Part Printing
In this tutorial, we will be teaching you everything you need to know about printing multiple parts at once on your 3D printer. Many new users focus on printing only one part at a time until they are happy with the results, but as you get more experienced you also have the option of importing multiple STL files into the software and printing them simultaneously. This can save a lot of setup and post-processing time. For example, imagine printing all 32 pieces of a chess set overnight and then coming back to an entirely finished game set in the morning. It would take a lot more work to print each piece one at a time.
The Simplify3D Software gives you a wide array of options for multi-part printing so that you can choose the best method for your specific needs. There are 3 different multi-part printing modes that we will be talking about.
- Single Process Printing Mode
- Multiple Process, Continuous Printing Mode
- Multiple Process, Sequential Printing Mode
The number of processes refers to the number of FFF processes that you will be configuring to control the print settings for your parts. The Simplify3D Software has the unique ability of allowing you to use different settings for each model you print. For example, if the King and Queen pieces in your chess set require different settings, you can easily configure this in the software and still print these parts simultaneously. This is one of the big advantages of the software and we will cover this in more detail later on.
Single Process Printing Mode
The first technique we will be covering is the single process printing mode. This is the easiest of all three methods and one that most users are probably already familiar with. This is the technique you would want to use if all of your parts use the exact same slicing settings and you don’t need the reliability and performance benefits that sequential printing offers. For example, you might be printing four identical LEGO bricks, like in the model found here. The models are small, simple, and you can arrange them close to one another to prevent excessive oozing while moving between parts. In this case, the single process printing mode is a great technique to use.
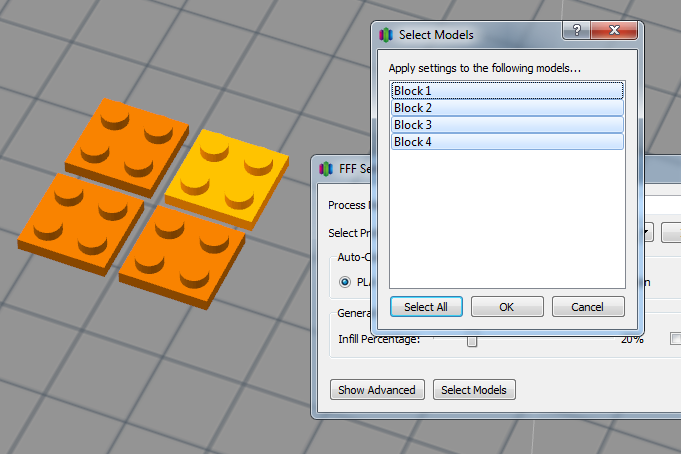 To begin, download and import the lego block STL file into the software. If you need to rename a model after importing, just double click on it to enter a new name. To make additional copies of this model, go to Models > Duplicate Selected Model. Make three identical copies and arrange them with a millimeter or two of spacing between them. Next, add a new FFF process and configure your slicing settings for the LEGO block models. In our case, we used medium quality, 60% infill. The last thing we need to do is select what models this specific FFF process will use. To do this, click the Select Models button in the bottom left of your FFF Settings. If we want to print all four pieces, make sure all four items are selected in the list or simply click the Select All button. Click Prepare to Print! to see the newly created printing instructions.
If you look at the G-Code preview, you should notice that the extruder prints all four pieces simultaneously. For each layer, the extruder prints one section of each block and then repeats this process. This results in a lot of movement back and forth between the different pieces, but as long as they are positioned fairly close together this should be okay.
Multiple Process, Continuous Printing Mode

For the next printing mode, we will be returning to the chess set example we described earlier. Go ahead and download the Knight and Pawn chess pieces. Import both of the STL files into the software and have a look at the features of the different models. You will notice that the pawn is very simplistic with gradual curves and features. The knight piece, on the other hand, has several fine detailed features such as eyes, hair, and teeth. It also has a fairly severe overhang on the chin of the model. In this case, it might be advantageous to use different slicing settings for these two models so that we can make sure they both print with the best quality possible.
As we learned in the previous section, we can use the Select Models button to determine what models a given FFF process uses. We could easily create one FFF process for the pawn and a second for the knight. That will give us more flexibility by letting us use the optimal settings for each model. First, let’s create the settings for the pawn. Create a new FFF process and call it “Pawn Process.” Use the Select Models button to make sure that this FFF process only applies to the pawn STL file. Now go ahead and configure the optimal settings for this model. We used 0.3mm layer heights with 3 outline perimeters and 0% infill. This will allow the part to print very quickly, which should be fine for the gradual rounded surfaces. If you want, you can Prepare and Preview this single process to make sure the pawn settings are configured properly.
Next, we will configure the settings for the knight. Add a new FFF process and call it the “Knight Process.” As before, use the Select Models button to make sure that this process only applies to the knight STL file. The settings for this part will be quite different than our pawn. We added support material for the chin overhang, used 0.15mm layer heights to help improve the quality of the fine features, and used 40% infill to help support the large flat surfaces at the top of the model. Save your settings and return to the main workspace.
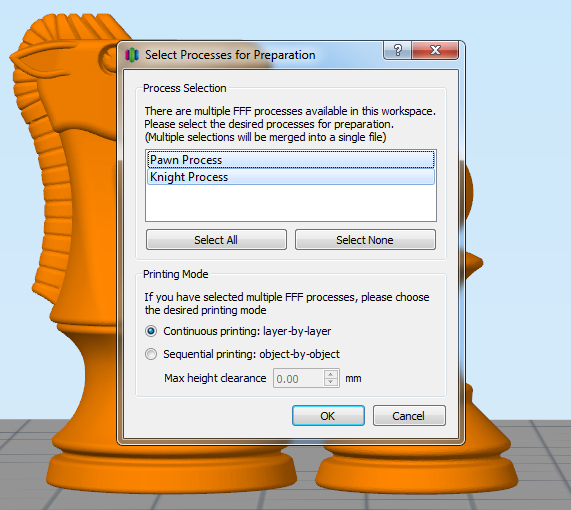 The last thing we need to do is click the Prepare to Print! button to generate the printing instructions for our multiple FFF processes. The software will detect that you have multiple FFF processes and ask you which ones you want to merge together. Select both the “Pawn Process” and the “Knight Process.”
At the bottom of this window there is also an option to configure how these multiple processes will be combined. If we select the continuous printing mode, each process will be merged together, one layer after another. The result will look very similar to the single process printing mode that we described in the previous section, however, we now have optimized settings for each individual model.
Multiple Process, Sequential Printing Mode
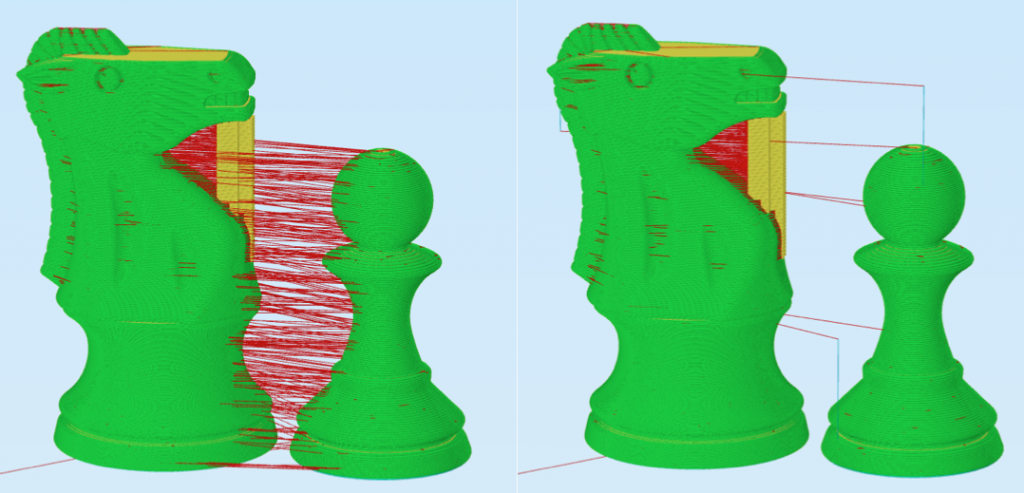 The last printing mode we are going to talk about is sequential printing. This is a very useful printing mode that can help improve reliability and print quality, but you may need to re-arrange your models to use this technique. During sequential printing, the software will print multiple layers of a single model before transitioning to the next model. So it might print 30 layers of our pawn model before it moves over to the knight and prints 30 layers of it. This significantly reduces the amount of movement between models which results in a much cleaner surface finish. It also improves the reliability of the overall print since one model could actually separate from the build plate and fail without ruining the entire batch of parts. The image to the left illustrates the difference between the continuous (left) and sequential (right) printing modes. The thin red lines represent rapid movements where the nozzle is moving to a new location to begin printing. As you can see, the sequential printing mode results in much fewer movements between parts for faster and better looking prints.
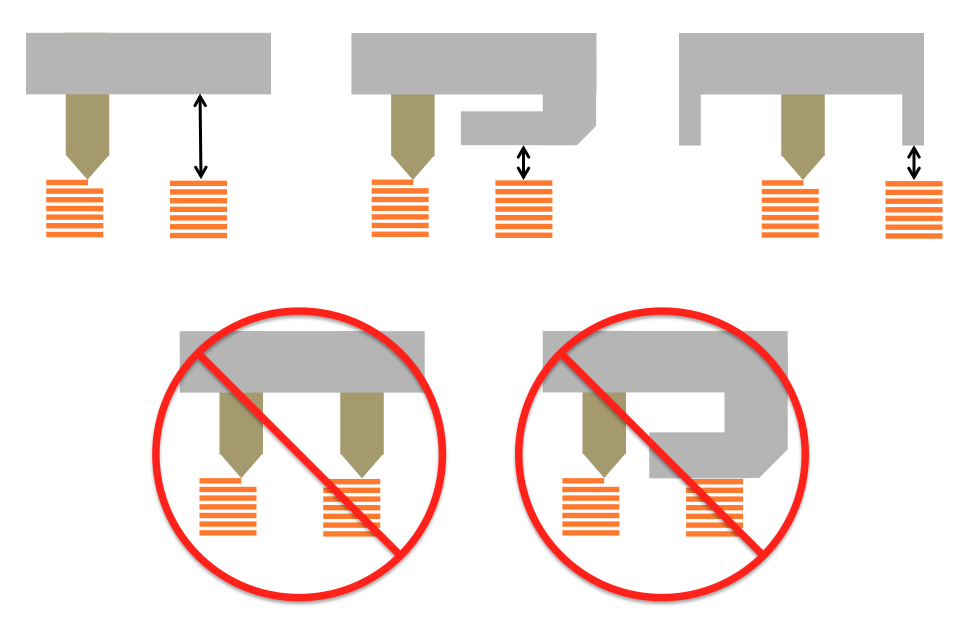 So now that you know how sequential printing works, we need to check your hardware to determine how to re-arrange your parts. If the nozzle does not have sufficient clearance, your printer will end up colliding with one of the previously printed parts. The image to the left shows several common extruder configurations. Keep in mind that there may be external accessories such as fans or structural frames that reduce the available clearance of your extruder. The orange lines in the left image represent two parts being sequentially printed side-by-side. The spacing between these parts is an additional factor that determines if sequential printing would be successful. For example, the two bottom configurations do not have sufficient clearance with the current part spacing. However, if the spacing between the orange parts was doubled or tripled, the two bottom configurations would gain additional clearance.
![]() To help illustrate this in more detail, let’s look at some real-world hardware. The Replicator 2 is a great example of how part spacing can affect your sequential printing clearance. The Replicator 2 blower fan sits right next to the extruder nozzle, which means that this printer has very little sequential printing clearance if the parts are arranged side-by-side and are only a few millimeters apart (see top image). However, if the part spacing is increased, the blower fan is no longer an issue and the X-axis rails become the new limiting factor (see bottom image). You could also arrange the parts so that one is positioned in front of the other, instead of side-by-side. As you can see, most printers will be able to use sequential printing, but it may require some extra planning and forethought to make sure the models are arranged in such a way to avoid any potential collisions.
To help illustrate this in more detail, let’s look at some real-world hardware. The Replicator 2 is a great example of how part spacing can affect your sequential printing clearance. The Replicator 2 blower fan sits right next to the extruder nozzle, which means that this printer has very little sequential printing clearance if the parts are arranged side-by-side and are only a few millimeters apart (see top image). However, if the part spacing is increased, the blower fan is no longer an issue and the X-axis rails become the new limiting factor (see bottom image). You could also arrange the parts so that one is positioned in front of the other, instead of side-by-side. As you can see, most printers will be able to use sequential printing, but it may require some extra planning and forethought to make sure the models are arranged in such a way to avoid any potential collisions.
Now that you have determined the best way to arrange your parts, the sequential printing setup process is very easy. You can follow the exact same steps outlined in the Multiple Process, Continuous Printing Section, however, we need to select a different option when we finally prepare our FFF processes. Instead of selecting the continuous printing mode when we choose what processes to prepare, we select the sequential printing option. This requires us to enter a value for the vertical clearance that was described above. For the Replicator 2 example, we have a measured clearance of 12mm, assuming the parts are far enough apart to avoid collisions with the blower fan. Enter the appropriate value for your printer and then press OK to create the combined G-Code file. If you followed these steps correctly, you can now enjoy better looking and more efficient multi-part prints!
We have now covered all of the multi-part printing modes available in the Simplify3D Software. Next time you have multiple parts to print, give these great time-saving techniques a try!