Beginner’s Guide to Auto Bed Leveling in Simplify3D
 Making sure your 3D printer has a level build platform or “bed” is a critical factor for ensuring accurate prints. Typically, users have to manually adjust screws to level the bed, which can be time consuming and tedious. Additionally, this process often has to be repeated after several prints due to the possibility of the bed going out of alignment after several hours of use. An unlevel bed can cause unexpected first layer issues resulting in poor adhesion of the printed part. In some cases, it can even lead to a clogged extruder or scratch marks on the build surface if the nozzle is far too close to the bed. Luckily, many new 3D printers include an automatic bed leveling feature that makes it easy to ensure you are printing on a level bed every time. This article will explain why the auto bed leveling feature is important and how to use it in Simplify3D.
How Auto Bed Leveling Works
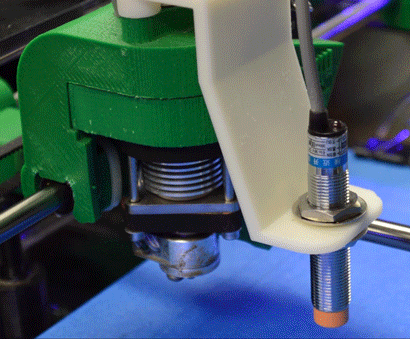 If your printer supports automatic bed leveling, this usually means that it includes some type or proximity sensor or switch near the tip of the extruder. When you initiate the bed leveling process, this sensor will probe several locations on the build platform to calculate the distance between the nozzle and the bed at each point. This data is then used to compute the actual orientation of your print bed with respect to the nozzle’s movement in the XY axes. While printing, the printer’s firmware will actively use this information to adjust the nozzle position as it moves across the bed. So even if your build platform is slightly unleveled, the firmware will make small adjustments to the Z-axis while you print to ensure the nozzle is always the perfect distance away from the print bed.
Using Auto Bed Leveling in Simplify 3D
If the printer you purchased already includes auto bed leveling directly from the manufacturer, then the Simplify3D profile for your printer should already be setup to use auto-leveling at the beginning of each print. Run a small test print and watch to see if your nozzle starts probing several different locations on the bed before the print begins. If you want to know more about how this process works, or you need to enable this functionality for another 3D printer, keep reading and we will explain all the details.
To enable auto bed leveling, we will need to edit the profile for your 3D printer. If you are using a new printer for the first time, you can download the stock Simplify3D profile for your machine by going to Help > Configuration Assistant from within the software. After the profile has loaded, click “Edit Process Settings”, go to the Scripts tab, and select the Starting script. This script defines the actions that your 3D printer will perform at the beginning of each print. We are going to add the G29 command to this script, which tells the printer to perform the auto-leveling process. However, keep in mind that the printer needs to perform is normal homing operation first before it begins the auto-leveling process. Make sure that you place the G29 command after the last G28 (homing command) in your starting script. The screenshot below shows an example profile that is properly setup for for automatic bed leveling.
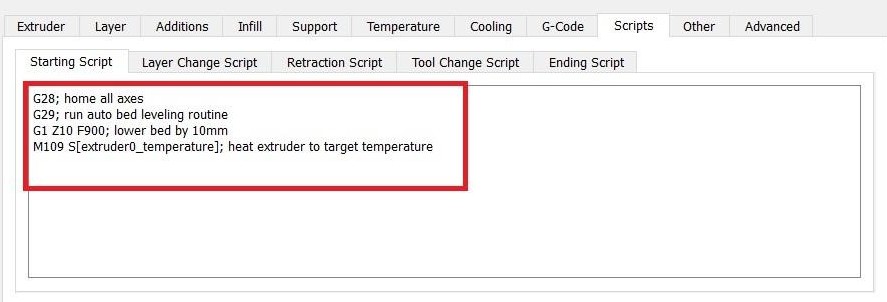
Please note that starting scripts may vary from one printer to another. Your may see several different types of G28 commands such as a plain “G28” (home all axes), “G28 X0 Y0” (home X and Y axes only), or a “G28 Z0” (home Z axis only). Just make sure that the G29 command comes after the very last G28 command in the script.
After you have made these changes, go ahead and save your new printer settings. If you want more information about how to save and manage your printer profiles in Simplify3D, please refer to our video tutorial on the subject. To test if the changes were successful, start a new print on your 3D printer and watch to make sure that the automatic bed leveling process executes at the start of the print. Keep in mind that auto-leveling process is primarily controlled by the firmware, so the exact locations where the probe moves to are already pre-defined on the machine. All you need to do is add the command mentioned above, and the printer will take care of everything else.
If you’ve gotten this far, then auto bed leveling should make sure that your 3D printer moves on a level plane on top of your print bed, but keep in mind that you may still need to make adjustments to your first layer settings for optimal adhesion. If you find that the nozzle is too far from the print bed after using auto-leveling, or you still have trouble getting your prints to stick to the bed, please refer to our extensive troubleshooting guide for more info on this topic.