Did you know that 3D printers have their own language? Today, many desktop 3D printers use a numerically controlled programming language made up of a series of commands called G-Code. Most of these commands start with a G (hence the name), but there are also some common machine-specific codes that start with an M. These commands tell your 3D printer exactly what actions to perform – where to move, what speed to use, what temperatures to set, and much more. For any maker, it is beneficial to have a basic knowledge of G-Code to understand how your 3D printer works, debug or perform maintenance on your machine, and verify your print files. This guide will explain the 10 most commonly used commands, what they do, and how to edit them in Simplify3D.
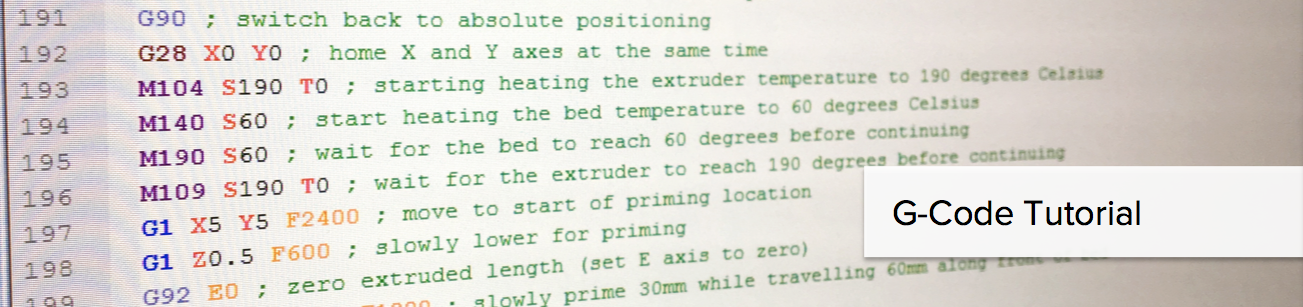
When slicing your model in Simplify3D the software will automatically generate the G-Code commands necessary to complete the print. You can view these commands by clicking “Save Toolpaths to Disk”, selecting a location for the file on your hard drive, and then opening the .gcode file in a text editor like Notepad or TextEdit. If you happen to be using Notepad++, you can download this handy XML file that will enable syntax highlighting for your gcode files, just like the image at the top of this article. To import the file in Notepad++, go to Language > Define your language, click Import, and select the XML file.
Although G-Code is the standard language for most 3D printers, some machines may use different file formats or commands. Even if your printer uses a different file format such as an .x3g file, please note that Simplify3D will still export both the .gcode and .x3g files to the location that you select. This is quite useful, as many of the other file formats are actually binary files. Viewing the text in the gcode file is much easier than readings lots of 1’s and 0’s in the binary files!
After you open your .gcode file in a text editor, you will notice that each command is typically listed on a separate line. The start of the line tells you what type of command it is, and then there may be several additional arguments that follow. You can even add comments within the file by placing a semi-colon before the comment so that it is ignored by the machine. So now that you have seen an example of what your 3D print files look like, here is our list of the 10 most common commands you need to know.
The 10 Most Common G-Code Commands for 3D Printing
For each command, we will provide a description of what the command does, specify what arguments may be needed, and even provide a few sample commands so that you can see how it is commonly used.
 This command tells the printer to run its homing sequence, which will move the toolhead to the far edges of the machine until it contacts the endstops at these locations. Most of your print files will begin with this command so that the printer starts from a known location. This is also a useful way to quickly move one axis out of the way, which may be useful at the end of a print so that you can remove your part.
Arguments:
If no arguments are provided, the machine will home all 3 axes. You can also specify which exact axes you want to home by adding an X, Y, or Z to the command.
Example usage:
G28 ; home all axes (X, Y, and Z)
G28 X Y ; home X and Y axes
G28 Z ; home Z axis only
G90 and G91 – Set Positioning Mode
Your printer can use either absolute or relative positioning. Absolute positioning means that you will be telling your 3D printer to move an exact XYZ coordinate. Relative positioning is used when you want to tell the printer how far it should move from the current location. Send a G90 command to tell your printer to use absolute positioning, or a G91 for relative positioning. The majority of your gcode file will likely use absolute positioning, since the slicer has already determined the exact XYZ coordinates to move to. However, if you don’t know the previous position of the toolhead, or you simply know that you want to move the head a certain distance along an axis, you can use relative positioning. While G90 and G91 control the positioning mode for the X, Y, and Z axes, you can also use M82 or M83 to set your extruder (E-axis) to absolute or relative positioning.
Arguments:
None
Example usage:
G90 ; use absolute positioning for the XYZ axes

G1 X10 F3600 ; move to the X=10mm position on the bed

G1 X20 F3600 ; move to X=20mm
G91 ; use relative positioning for the XYZ axes

G1 X10 F3600 ; move 10mm to the right of the current location

G1 X10 F3600 ; move another 10mm to the right
 This command probably makes up 95% of your gcode files, so it is a good one to learn! The G1 command tells your printer to move in a straight line to the location that you specify. You can use this to move just a single axis, or multiple axes at once. Keep in mind that your extruder is controlled just like any other axis, so you can also use this command to extrude or retract filament from the nozzle.
Arguments:
Use X, Y, or Z values to tell the printer what position to move to. Keep in mind that these values will obey the current positioning mode, so you can specify them using either absolute or relative coordinates. Include an E value if you want to move the extruder as well. The E value corresponds to the position of your filament spool, so if you move the E axis by 10mm, that would cause 10mm of your filament to be pushed into the nozzle. Since the nozzle diameter is usually much smaller than your filament diameter, 10mm of filament pushed into the nozzle may create an extrusion that is hundreds of millimeters long! For this reason, the E values that you will see in your file are typically quite small compared to the X, Y, and Z values. Finally, you can use an F value to tell the printer what speed to use for the movement. This speed must always specified in units of mm/min, so even if you use mm/s in your slicing software, you will still need use mm/min anytime you are sending a command directly to the printer.
Most printers support “sticky” coordinates, which means that you only need to specify the arguments for the axes you actually want to move. So if you only wanted to move the Z axis, you would just include the Z argument as well as an F value to define the speed.
Example usage:
G1 X0 Y0 F2400 ; move to the X=0 Y=0 position on the bed at a speed of 2400 mm/min

G1 Z10 F1200 ; move the Z-axis to Z=10mm at a slower speed of 1200 mm/min

G1 X30 E10 F1800 ; push 10mm of filament into the nozzle while moving to the X=30 position at the same time
G92 – Set Current Position
Use this command to set the current position of your axes. This can be useful if you want to change or offset the location of one of your axes. One of the most common uses for this command is actually with your E axis (the filament position). You can quickly override the current filament position so that all future commands will now be relative to this new value. It is common to do this at the start of each layer or right before a prime or retraction command.
Arguments:
Specify the absolute coordinate for any axis that you wish to overwrite. You can include the X, Y, Z, and E axes. If you do not include one of these axes in the command, the position will remain unchanged.
Example usage:
G92 E0 ; set the current filament position to E=0

G1 E10 F800 ; extrude 10mm of filament
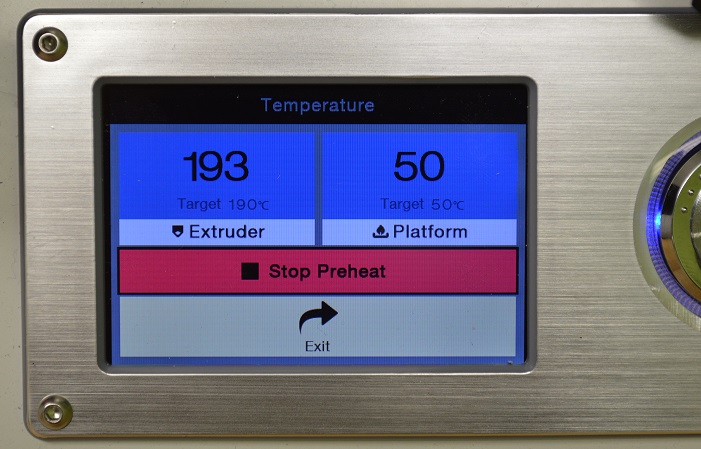 Use these commands to set the temperature of your extruder. The M104 command starts heating the extruder, but then allows you to run other commands immediately afterwards. The M109 command will actually wait until the desired temperature is reached before allowing any other commands to run. For this reason, you will frequently see an M109 at the top of your Simplify3D gcode files, as this allows the extruder to reach the necessary temperature before the print begins.
While most machines use M104 and M109, some firmwares may use slightly different commands. For example, if you are using a machine that reads x3g files, then you may use an M133 command for stabilizing your extruder instead of M109. If you are using a machine that runs a variant of the FlashForge Dreamer or Dremel firmwares, you’ll want to use an M6 command to stabilize your extruder. You can check what firmware type you are using in Simplify3D by going to Tools > Firmware Configuration.
Arguments:
The S value specifies the extruder temperature in degrees Celsius. The T value can be used if you have more than one extruder, as it allows you to specify which exact extruder temperature you want to set. If you have a dual extrusion machine, typically T0 is the right extruder, and T1 is the left extruder. If you only have a single extruder machine, you can typically omit the T parameter entirely.
Example usage:
M104 S190 T0 ; start heating T0 to 190 degrees Celsius

G28 X0 ; home the X axis while the extruder is still heating

M109 S190 T0 ; wait for T0 to reach 190 degrees before continuing with any other commands
M140 and M190 – Bed Heating Commands
Use these commands to set the temperature of your heated build platform. The syntax is very similar to the M104 and M109 commands mentioned above. Sending the M140 command begins heating the bed, but allows you to run other commands immediately afterwards. The M190 command will wait until the bed temperature is reached before allowing any other commands to run. Keep in mind that the heated bed on your printer may take several minutes to reach elevated temperatures. So don’t be surprised if you see your printer pausing while waiting on an M190 command to finish heating the bed. Because this process can take a long time, it may be a good idea to start heating the bed at the beginning of your routine using an M140 command, which would allow you to do other actions such as homing or nozzle purging while the bed is still pre-heating. Just make sure to include an M190 before the print begins, as the bed temperature can be an important factor for first layer adhesion.
As with the M104 and M109 commands, these bed heating commands can differ depending on what firmware you are using. If your machine reads x3g files, then you can use the M134 command for stabilizing your bed instead of M190. If you are using a variant of the FlashForge Dreamer or Dremel firmwares, you’ll want to use an M7 command to stabilize your bed.
Arguments:
The S value specifies the bed temperature in degrees Celsius. No other arguments are typically needed, as most machines only have a single heated build platform.
Example usage:
M140 S50 ; start heating the bed to 50 degrees Celsius

G28 ; home all 3 axes while the bed is still heating

M190 S50 ; wait until the bed reaches 50 degrees before continuing
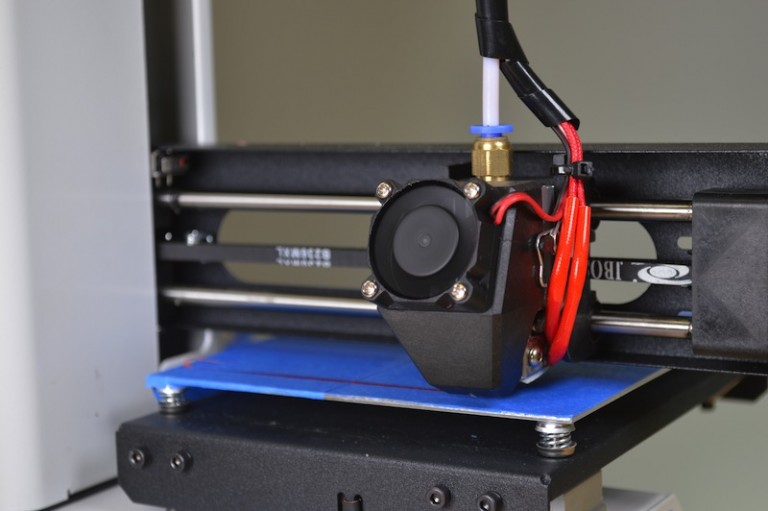
M106 – Set Fan Speed
This command allows you to set the speed of your printer’s part cooling fan. This is an external cooling fan that is pointed towards the part that you are printing. Keep in mind that your printer may also have an extruder fan that helps cool the extruder drive mechanism, so make sure you are looking at the correct fan first. While most printers have an external cooling fan, there are a few exceptions, so check your machine first to make sure it has an external cooling fan that you can control.
Arguments:
The S value sets the speed of the cooling fan in a range between 0 (off) and 255 (full power).
Example usage:
M106 S255 ; set the fan to full speed
M106 S127 ; set the fan to roughly 50% power
M106 S0 ; turn off the fan completely
How to Send or Edit G-Code Commands
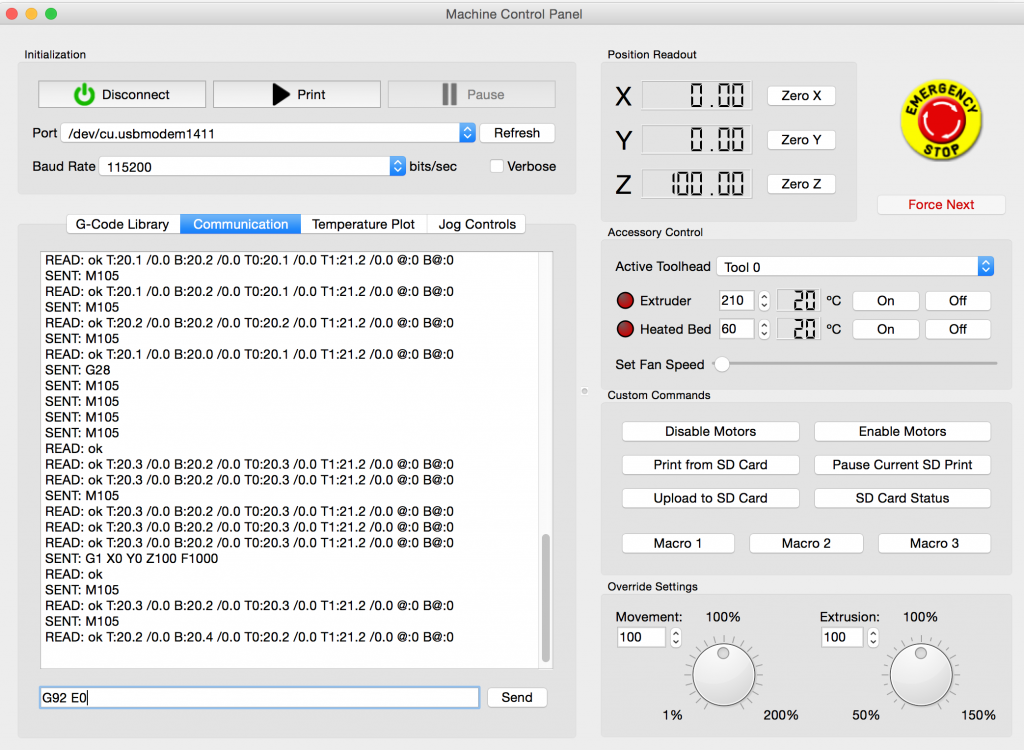 If your machine accepts normal gcode files like most RepRap machines, then a great way to test different commands is by manually sending them one-at-a-time to see how your printer responds. You can do this within Simplify3D by going to Tools > Machine Control Panel. Once in the Machine Control Panel make sure you are connected to your 3D printer and then use the Communications tab to send your printer a line of G-Code. Just type the command that you want to send at the bottom of the window and then press the Send button. None of the commands mentioned in this article are permanent, so you can always reboot the printer if you want to stop what the machine is doing or get back to a fresh state.
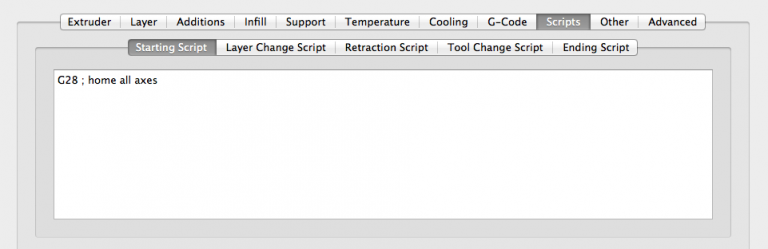
Once you feel comfortable with the commands, you may find that you want to run the same series of commands before or after each print. Thankfully, Simplify3D gives you the ability to customize the routines that are run at the start and end of each print, so you can easily update your settings so that your 3D printer automatically performs these actions. To do this, click “Edit Process Settings” and then select the Scripts tab. There are several different scripts on this tab that you can edit. Each one is used at different times during your print. For example, the Starting script is used at the very beginning of the print, while the Ending script is run at the very end of the print. Depending on where you want to make your changes select the appropriate categories and start editing. The default profile that Simplify3D provides for your 3D printer will already include scripts that we have tested and verified, so you can use these as a starting point.
 Each time you make a change to these scripts, you can try running a quick test print to make sure the printer behaves like you would expect. Once you are happy with the changes, you can use Simplify3D’s profile management system to permanently save these new settings for future prints. You can even create multiple versions of your profile if you want to keep track of your changes along the way.
We have now covered all the fundamentals you’ll need to begin testing G-Code on your 3D printer. If you are interested in other tutorials like this that can help teach you the basics of 3D printing, click here to view our full article library.